Generate screenshots of your code with a serverless function
I was recently looking for ways to automate sharing code snippets, I thought that generating these code snippets images by calling a serverless function could be a pretty cool use case to apply some of the serverless concepts and tricks I've learned the past few months. My aim here was to be able to send a file or the string of a code snippet to an endopoint that would call a function and get back the base64 string representing the screenshot of that same code snippet. I could then put that base 64 string inside a png file and get an image. Sounds awesome right? Well, in this post I'll describe how I built this!
I've used carbon.now.sh quite a bit in the past, and I noticed that the code snippet and the settings I set on the website are automatically added as query parameters to the URL.
E.g. you can navigate to https://carbon.now.sh/?code=foobar for example and see the string "foobar" present in the code snippet generated.
Thus to automate the process of generating a code source image from this website, I needed to do the following:
- Call the cloud function: via a POST request and pass either a file or a base64 string representing the code that I wanted the screenshot of. I could additionally add some extra query parameters to set up the background, the drop shadow, or any Carbon option.
- Generate the Carbon URL: to put it simply here, decode the base64 or get the file content from the payload of the incoming request, parse the other query parameters and create the equivalent carbon.now.sh URL.
- Take the screenshot: use a chrome headless browser to navigate to the generated URL and take the screenshot.
- Send back the screenshot as a response to the request.
The first step involved figuring out what kind of request I wanted to handle and I settled for the following patterns:
- Sending a file over POST
curl -X POST -F data=@./path/to/file https://my-server-less-function.com/api/carbon - Sending a string over POST
curl -X POST -d "data=Y29uc29sZS5sb2coImhlbGxvIHdvcmxkIik=" https://my-server-less-function.com/api/carbon
This way I could either send a whole file or a string to the endpoint, and the cloud function could handle both cases. For this part, I used formidable which provided an easy way to handle file upload for my serverless function.
Once the data was received by the function, it needed to be "translate" to a valid carbon URL. I wrote the following function getCarbonUrl to take care of that:
Implementation of getCarbonUrl
1const mapOptionstoCarbonQueryParams = {2backgroundColor: 'bg',3dropShadow: 'ds',4dropShadowBlur: 'dsblur',5dropShadowOffsetY: 'dsyoff',6exportSize: 'es',7fontFamily: 'fm',8fontSize: 'fs',9language: 'l',10lineHeight: 'lh',11lineNumber: 'ln',12paddingHorizontal: 'ph',13paddingVertical: 'pv',14theme: 't',15squaredImage: 'si',16widthAdjustment: 'wa',17windowControl: 'wc',18watermark: 'wm',19windowTheme: 'wt',20};2122const BASE_URL = 'https://carbon.now.sh';2324const defaultQueryParams = {25bg: '#FFFFFF',26ds: false,27dsblur: '50px',28dsyoff: '20px',29es: '2x',30fm: 'Fira Code',31fs: '18px',32l: 'auto',33lh: '110%',34ln: false,35pv: '0',36ph: '0',37t: 'material',38si: false,39wa: true,40wc: true,41wt: 'none',42wm: false,43};4445const toCarbonQueryParam = (options) => {46const newObj = Object.keys(options).reduce((acc, curr) => {47/**48* Go through the options and map them with their corresponding49* carbon query param key.50*/51const carbonConfigKey = mapOptionstoCarbonQueryParams[curr];52if (!carbonConfigKey) {53return acc;54}5556/**57* Assign the value of the option to the corresponding58* carbon query param key59*/60return {61...acc,62[carbonConfigKey]: options[curr],63};64}, {});6566return newObj;67};6869export const getCarbonURL = (source, options) => {70/**71* Merge the default query params with the ones that we got72* from the options object.73*/74const carbonQueryParams = {75...defaultQueryParams,76...toCarbonQueryParam(options),77};7879/**80* Make the code string url safe81*/82const code = encodeURIComponent(source);8384/**85* Stringify the code string and the carbon query params object to get the proper86* query string to pass87*/88const queryString = qs.stringify({ code, ...carbonQueryParams });8990/**91* Return the concatenation of the base url and the query string92*/93return `${BASE_URL}?${queryString}`;94};
This function takes care of:
- making the "code string" URL safe using
encodeURIComponentto encode any special characters of the string - detecting the language: for this I could either look for any
languagequery param, or fall back toautowhich and let carbon figure out the language. - taking the rest of the query string and append them to the URL
Thanks to this, I was able to get a valid Carbon URL 🎉. Now to automate the rest, I would need to paste the URL in a browser which would give the corresponding image of it and take a screenshot. This is what the next part is about.
This step is the core and most interesting part of this implementation. I was honestly pretty mind blown to learn that it is possible to run a headless chrome browser in a serverless function to begin with. For this, I used chrome-aws-lambda which despite its name or what's specified in the README of the project, seems to work really well on any serverless provider (in the next part you'll see that I used Vercel to deploy my function, and I was able to get this package running on it without any problem). This step also involves using puppeteer-core to start the browser and take the screenshot:
Use chrome-aws-lambda and puppeteer-core to take a screenshot of a webpage
1import chrome from 'chrome-aws-lambda';2import puppeteer from 'puppeteer-core';34const isDev = process.env.NODE_ENV === 'development';56/**7* In order to have the function working in both windows and macOS8* we need to specify the respecive path of the chrome executable for9* both cases.10*/11const exePath =12process.platform === 'win32'13? 'C:\\Program Files (x86)\\Google\\Chrome\\Application\\chrome.exe'14: '/Applications/Google Chrome.app/Contents/MacOS/Google Chrome';1516export const getOptions = async (isDev) => {17/**18* If used in a dev environment, i.e. locally, use one of the local19* executable path20*/21if (isDev) {22return {23args: [],24executablePath: exePath,25headless: true,26};27}28/**29* Else, use the path of chrome-aws-lambda and its args30*/31return {32args: chrome.args,33executablePath: await chrome.executablePath,34headless: chrome.headless,35};36};3738export const getScreenshot = async (url) => {39const options = await getOptions(isDev);40const browser = await puppeteer.launch(options);41const page = await browser.newPage();4243/**44* Here we set the viewport manually to a big resolution45* to ensure the target,i.e. our code snippet image is visible46*/47await page.setViewport({48width: 2560,49height: 1080,50deviceScaleFactor: 2,51});5253/**54* Navigate to the url generated by getCarbonUrl55*/56await page.goto(url, { waitUntil: 'load' });5758const exportContainer = await page.waitForSelector('#export-container');59const elementBounds = await exportContainer.boundingBox();6061if (!elementBounds)62throw new Error('Cannot get export container bounding box');6364const buffer = await exportContainer.screenshot({65encoding: 'binary',66clip: {67...elementBounds,68/**69* Little hack to avoid black borders:70* https://github.com/mixn/carbon-now-cli/issues/9#issuecomment-41433470871*/72x: Math.round(elementBounds.x),73height: Math.round(elementBounds.height) - 1,74},75});7677/**78* Return the buffer representing the screenshot79*/80return buffer;81};
Let's dive in the different steps that are featured in the code snippet above:
- Get the different options for puppeteer (we get the proper executable paths based on the environment)
- Start the headless chrome browser
- Set the viewport. I set it to something big to make sure that the target is contained within the browser "window".
- Navigate to the URL we generated in the previous step
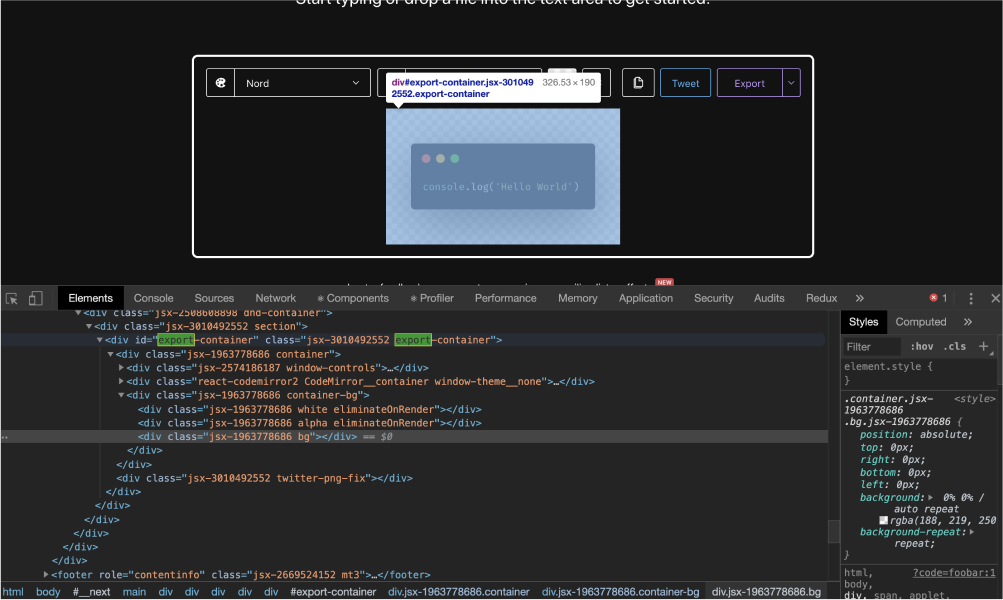
- Look for an HTML element with the id
export-container, this is the div that contains our image. - Get the
boundingBoxof the element (see documentation for bounding box here) which gave me the coordinates and the width/height of the target element. - Pass the boundingBox fields as options of the screenshot function and take the screenshot. This eventually returns a binary buffer that can then be returned back as is, or converted to base64 string for instance.
Now that the function was built, it was deployment time 🚀! I chose to give Vercel a try to test and deploy this serverless function on their service. However, there was a couple of things I needed to do first:
- Put all my code in an
apifolder - Create a file with the main request handler function as default export. I called my file
carbonara.tshence users wanting to call this cloud function would have to call the/api/carbonaraendpoint. - Put all the rest of the code in a
_libfolder to prevent any exported functions to be listed as an endpoint.
Then, using the Vercel CLI I could both:
- Run my function locally using
vercel dev - Deploy my function to prod using
vercel --prod
You can try this serverless function using the following curl command:
Sample curl command to call the serverless function
1curl -d "data=Y29uc29sZS5sb2coImhlbGxvIHdvcmxkIik=" -X POST https://carbonara-nu.now.sh/api/carbonara
If you want to deploy it on your own Vercel account, simply click the button bellow and follow the steps:
Otherwise, you can find all the code featured in this post in this Github repository.
After reading all this you might be asking yourself: "But Maxime, what are you going to do with this? And why did you put this in a serverless function to begin with?". Here's a list of the few use cases I might have for this function:
- To generate images for my meta tags for some articles or snippets (I already do this now 👉 Tweet from @MaximeHeckel
- To be able to generate carbon images from the CLI and share them with my team at work or other developers quickly
- Enable a "screenshot" option for the code snippets in my blog posts so my readers could easily download code screenshots.
- Many other ideas that I'm still working on right now!
But, regardless of its usefulness or the number of use cases I could find for this serverless function, the most important is that I had a lot of fun building this and that I learned quite a few things. I'm now definitely sold on serverless and can't wait to come up with new ideas.