The little guide to CI/CD for frontend developers
If you've been following my work for a while, or read my previous articles, you might have noticed that I love building tools that improve the reliability and the scalability of the projects I work on. Continuous Integration and Continuous Delivery pipeline, also referred to as CI/CD, is one of them. Building such a pipeline and making it as automated as possible, is like giving superpowers to your team. With it, you can enable your organization to deliver:
- Code that respects consistent styling guidelines and formatting
- Reliable software is tested and so are its subsequent releases to avoid regressions
- Consistent releases: releasing a new version to the customer is as easy as possible and your team can ship fixes to production in no time
- Features that can easily be reverted if they degrade the user experience
- Any upcoming change to the product can be previewed as an independent unit of change
- Use every developer's time as efficiently as possible. Developers cost money and you don't want them to be constantly putting out fires in production. Automate testing and releases, remove all the humans in the process as much as possible. More testing means fewer bugs means less fear of change. Less fear of change means more experimentation and innovation. More automation means more time for experimentation and innovation.
Change must be in the DNA of the team -- Eric Elliott in How to Build a High-Velocity Development Team
If your team suffers from complex release processes, struggles to patch production within the same day or to get a new feature to the customers reliably: this article is for you! In this post, I'll give you all the tools that you and your team need to build a high-velocity development environment, eradicate the fear of releasing, and establish processes for your team to become unstoppable. Like the title suggests, the following will be written for frontend developers since this is the area where I'm the most knowledgeable, especially when it comes to tooling. However, the concepts and steps that I will detail can also be valuable to backend developers who are looking to improve their team's testing and release pipeline.
The impact of automation on your team, your org, and your users
When starting to work on a new CI/CD pipeline, or looking at improving an existing one, it's essential to target the efforts where you want to make the most positive impact:
- unit-testing, formatting, linting, and integration-testing: impact mainly the developers within your team. Having a good habit of writing unit tests, and having consistent code styling can increase velocity within the team. These are what I called fast to run fast to fail: they can be run quickly to identify any issues within the codebase and act as the first safeguard against bugs.
- end to end testing, automated release, and branch previews are more impactful at the cross-functional or organizational level. End to End testing will, for example, enable your frontend team and backend team to test some critical user paths. The automated releases ensure things are released with as little friction as possible and that your entire org can address a customer request as fast as possible. Finally, branch previews enable your frontend team and QA team to review work before it lands on production. Each upcoming feature or fix can be hosted in its service and tested on its own.
- feature flags and accessibility testing are more customer-facing. They guarantee a better and more inclusive experience for all your users and also avoid any service disruption when it comes to releasing new features.
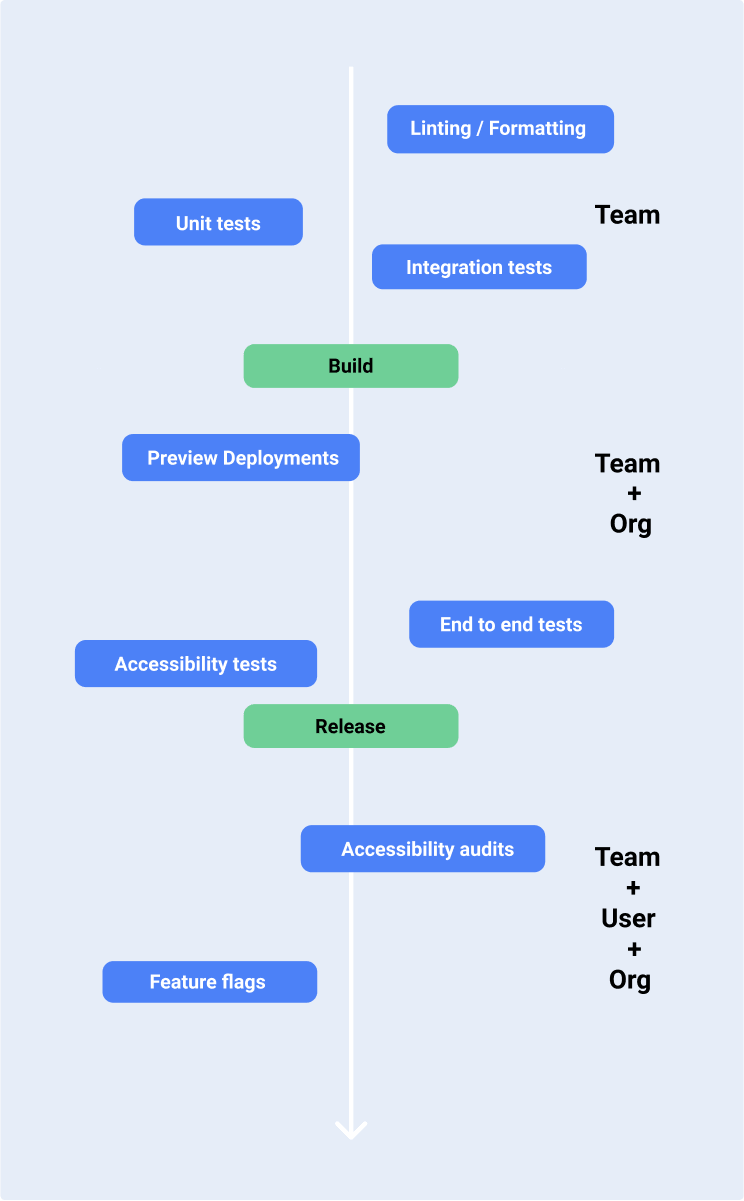
The following showcases a rather complete CI/CD pipeline and all its different steps. Additionally I separated that pipeline in 3 parts, representing which of the team, the org and the end-user each step of the pipeline is bringing the most positive impact:
Linting, Formatting, and Unit tests
These three items are the foundational pieces for your team to ship more reliable software, faster.
Linting and formatting
Linting and formatting are essential to keep your codebase consistent and clean. Each team member should follow the same rules and conventions when it comes to writing code. Consistency in the codebase itself is essential:
- you do not want to bring confusion on how to write a given piece of code in your app when you onboard a new team member
- you do not want to have to document multiple ways of doing the same thing
For this step, I want my tools to be fast and reliable. It should only take **a few seconds **to lint and format my codebase. As a frontend engineer, I use
- ESlint for linting, it comes with a set of rules to write proper Javascript, and these rules can be customized to your own team's fit. Additionally, should you need something more specific, you can build your own ESLint rules, I wrote about it here, it's an interesting exercise that involves Abstract Syntax Tree (AST).
- Prettier for formatting. It became the defacto formatting tool for Javascript developers within the last few years. I set it up in my project and editor in a way that saving a file will format it automatically for me.
As said above, this step must be super fast. So fast that you can execute this step as a pre-commit hook (an arbitrary script that runs on every commit. I like using husky to set these up) as it will ensure that the code is formatted and readable before it's up for review by your teammates.
Unit tests
As stated earlier, I like to call these tests fast to run, **fast to fail. **They should not take an extensive amount of time to run and should reveal errors or bugs in a matter of a few seconds or even a few minutes depending on the scale of your project.
The aim here is to test each part of your app as "units" or isolated components. In a React project, for example, these tests can cover:
- Components: I like to use unit tests to ensure my components have the proper behavior and are functioning as expected on their own, i.e.** not in combination with other components or views of my app**.
- Reducers / State / Actions: unit tests can help to validate that your state is updated in a specific way for a given action. Reducers are pure functions (i.e. functions that always return the same output for a given input)
- Utility functions: we build a lot of helpers, or abstract a lot of functions in our projects: these are a perfect example of things that you might want to write unit tests for.
I like unit tests a lot because they act as a sanity check for your project to make sure its individual pieces work as intended over time, in a very efficient way (fast, reliable).
As frontend developers, you might have probably heard about Jest. It's the most popular Javascript testing framework and has been for a few years now. Jest is the testing tool I always install first in my Javascript projects. To run tests on my React apps, for example, I use it in combination with:
- @testing-library/react : If you want to write maintainable tests over time without worrying about implementation details. I mainly use it to render individual components and test them.
- @testing-library/react-hooks: This library gives you all the tooling necessary to test your custom hooks.
- @testing-library/jest-dom: This package gives you extra DOM element matchers to make your tests even easier to write and read.
The @testing-library maintainers also provided a ton of other packages that will help you test your app no matter the framework (Svelte, VueJS, etc).
Below, you will find code snippets showcasing some test suites that are meant to illustrate how I usually write tests in different situations.
In this one, I test a simple React Button component using @testing-library/react and Jest.
Example of a unit test suite for a Button component using @testing-library/react
1// Button.jsx2import React from 'react';34const Button = (props) => {5const {6onClick,7disabled = false,8loading = false,9children,10...rest11} = props;1213return (14<button {...rest} onClick={() => onClick()} disabled={loading || disabled}>15{loading ? 'Loading ...' : children}16</button>17);18};1920export default Button;2122// ===============23// Button.test.jsx24import React from 'react';25import { render, screen } from '@testing-library/react';26import userEvent from '@testing-library/user-event'; // I use the userEvent package to manage events rather than fireEvent27import '@testing-library/jest-dom/extend-expect';28import Button from './';2930describe('Button Component', () => {31it('Renders the Button as expected and clicking on it calls the function passed in the onClick prop', () => {32const onClickMock = jest.fn();33const { container, debug } = render(34<Button name="test-btn" onClick={onClickMock}>35Test36</Button>37);3839expect(screen.getByRole('button')).toBeInTheDocument(); // .toBeInTheDocument is a handy function that is given by the jest-dom/extend-expect package40expect(screen.getByRole('button')).toHaveTextContent('Test');41expect(screen.getByRole('button')).not.toHaveAttribute('disabled');42userEvent.click(screen.getByRole('button'));43expect(onClickMock).toHaveBeenCalled();44});4546it('Renders the Button with loading set to true and clicking on it does not call the function passed in the onClick prop', () => {47const onClickMock = jest.fn();48const { container, debug } = render(49<Button name="test-btn" loading onClick={onClickMock}>50Test51</Button>52);5354expect(screen.getByRole('button')).toBeInTheDocument();55expect(screen.getByRole('button')).toHaveTextContent('Loading ...');56expect(screen.getByRole('button')).toHaveAttribute('disabled');57userEvent.click(screen.getByRole('button'));58expect(onClickMock).not.toHaveBeenCalled(); // you can negate a specific matcher by inserting `.not` before calling it59});6061it('Renders the Button with disabled set to true and clicking on it does not call the function passed in the onClick prop', () => {62const onClickMock = jest.fn();63const { container, debug } = render(64<Button name="test-btn" disabled onClick={onClickMock}>65Test66</Button>67);6869expect(screen.getByRole('button')).toBeInTheDocument();70expect(screen.getByRole('button')).toHaveTextContent('Test');71expect(screen.getByRole('button')).toHaveAttribute('disabled');72userEvent.click(screen.getByRole('button'));73expect(onClickMock).not.toHaveBeenCalled();74});75});
For this code snippet, I focus on testing a reducer function that can handle two different types of actions. I love testing reducers because as pure functions, they have predictable outputs regardless of the complexity, thus writing tests for these is always an easy win for your team.
Example of a unit test for a reducer / function
1// reducer.js2const initialState = {};34const reducer = (state = initialState, action) => {5switch (action.type) {6case 'FETCH_POSTS': {7const { payload } = action;8const items = payload.reduce((accumulator, currentItem) => {9accumulator[currentItem.id] = currentItem;10return accumulator;11}, {});12return { ...state, ...items };13}14case 'CLEAR_POSTS': {15return {};16}17default: {18return state;19}20}21};2223export default reducer;2425// ===============26// reducer.test.js27import reducer from './reducer';2829describe('Reducer', () => {30it('Handles the FETCH_POST action as expected when the initial state is an empty object', () => {31const action = {32type: 'FETCH_POSTS',33payload: [34{35userId: 1,36id: 1,37title: 'Title Test',38body: 'Test',39},40{41userId: 1,42id: 2,43title: 'Title Test 2',44body: 'Test2',45},46],47};4849const initialState = {};5051expect(reducer(initialState, action)).toEqual({521: { body: 'Test', id: 1, title: 'Title Test', userId: 1 },532: { body: 'Test2', id: 2, title: 'Title Test 2', userId: 1 },54});55});5657it('Handles the FETCH_POST action as expected when the initial state is an empty object', () => {58const action = {59type: 'FETCH_POSTS',60payload: [61{62userId: 1,63id: 1,64title: 'Title Test',65body: 'Test',66},67{68userId: 1,69id: 2,70title: 'Title Test 2',71body: 'Test2',72},73],74};7576const initialState = {773: {78body: 'Test',79id: 3,80title: 'Title Test 3',81userId: 2,82},83};8485expect(reducer(initialState, action)).toEqual({863: { body: 'Test', id: 3, title: 'Title Test 3', userId: 2 },871: { body: 'Test', id: 1, title: 'Title Test', userId: 1 },882: { body: 'Test2', id: 2, title: 'Title Test 2', userId: 1 },89});90});9192it('Handles the CLEAR_POSTS action as expected', () => {93const action = {94type: 'CLEAR_POSTS',95};9697const initialState = {983: {99body: 'Test',100id: 3,101title: 'Title Test 3',102userId: 2,103},104};105106expect(reducer(initialState, action)).toEqual({});107});108});
Integration and end-to-end testing
I'm dedicating this section to both integration and end-to-end testing as I sometimes see these two types of testing used interchangeably and I think that it's important to know the nuance.
Integration tests
This is perhaps where most of your efforts should go when writing tests.
Why? Well, when considering the effort it takes to write tests, the time it takes to execute them and the confidence level it gives back to your team: integration tests are simply the best. Unit tests give you a low confidence level but are fast to run, while end-to-end tests are slow to execute (sometimes taking over an hour in some large apps) and require expensive infrastructure to run but give you the highest confidence level possible. Integration tests, however, are easier to write than e2e tests and help you validate more complex behaviors than unit tests, all that in a pretty short amount of time.
Write tests not too much mostly integration -- Guillermo Rauch
If you want to know why in detail, I advise reading Kent C Dodd's Write Tests blog post.
While unit tests help to test parts of your project in isolation, integration tests help to test whether an entire set of units work together as expected. They also allow you to test full user flows and all the different paths they can take (error state, loading state, success state).
With integration tests, I like testing groups of components, functionalities together such as:
- Navigation: Does clicking on the user setting menu item load the expected view?
- Forms: Fill up the form in all possible ways (valid and invalid, with and without optional fields). Test that the expected error messages are displayed when invalid. Validate that clicking on submit sends the right payload when valid. A form like this may be composed of components, reducers, and utility functions that we tested individually in the unit test phase. Here we're testing them working altogether in a specific context.
- **Views **depending on external data: Test your list view that's fetching some data with different mocked API responses: does it show the proper empty state if there's no data? Is the filter button enabled if your API returned an error? Does it show a notification if the fetch was successful?
I could go on and on with different examples but this is roughly the main use-cases I usually focus on validating when writing integration tests. I try to validate all the possible paths that a group of components, a form, or a view can take.
When it comes to integration tests I'm split between using two different tools, sometimes within the same project.
- Jest: You can write pretty advanced integration tests with Jest,
@testing-library/react, and all the cool tools we've mentioned before. I recently started using msw to mock the APIs that the views I'm testing are depending on different. - Cypress: It comes with a neat way to write fixtures and mock API endpoints and thus run some integration tests. I mainly use it to validate some browser-related behaviors like: are the proper query parameters passed to the URL? Can I load a view in a specific state by adding this set of parameters to the URL? Is a specific set of values set in local storage or not?
Sample React app that fetches posts and handles different states
1import React from 'react';2import Button from './Button';3import reducer from './reducer/reducer';45const App = () => {6const [shouldFetch, setShouldFetch] = React.useState(false);7const [error, setError] = React.useState(null);8const [posts, dispatch] = React.useReducer(reducer, {});910React.useEffect(() => {11if (shouldFetch) {12fetch('https://jsonplaceholder.typicode.com/posts')13.then((response) => response.json())14.then((json) => {15dispatch({16type: 'FETCH_POSTS',17payload: json,18});19setShouldFetch(false);20})21.catch(() => setError({ message: 'Error :(' }));22}23}, [shouldFetch]);2425if (error) {26return <div data-testid="error">{error.message}</div>;27}2829return (30<div>31{Object.values(posts).length > 0 ? (32<ul data-testid="posts">33{Object.values(posts).map((post) => (34<li key={post.id} data-testid="post">35{post.title}36</li>37))}38</ul>39) : (40<div data-testid="empty">No Posts</div>41)}42<Button onClick={() => setShouldFetch(true)} loading={shouldFetch}>43Fetch Posts44</Button>45</div>46);47};4849export default App;
You might have noticed that this app uses the same Button component and reducer we tested in isolation (i.e. unit tested) before. As stated before, the aim of integration tests is to validate whether these units can now work together in a specific use case. Below is an example of a typical integration test I'd write for an app like the one showcased above. I'd test the different possible outcomes for this list of posts:
- The list of posts loads as expected and is properly displayed
- The list of posts loads but is empty
- An error occurs when fetching the posts and the fallback error state is displayed as expected
Example of integration test suite I'd write to validate the different paths possible for the sample app
1import React from 'react';2import { rest } from 'msw';3import { setupServer } from 'msw/node';4import { render, fireEvent, waitFor, screen } from '@testing-library/react';5import userEvent from '@testing-library/user-event';6import '@testing-library/jest-dom/extend-expect';7import App from './App';89/**10Here I set up our mock server using msw and msw/node.11When testing our app, any requests to https://jsonplaceholder.typicode.com/posts will return12the output specified below. This allows me to test different scenarios like:13- What if my endpoint returns an empty array14- What if my requests fails1516This where the true value of integration tests resides.17*/18const server = setupServer(19rest.get('https://jsonplaceholder.typicode.com/posts', (req, res, ctx) => {20return res(21ctx.json([22{23userId: 1,24id: 1,25title: 'Title Test',26body: 'Test',27},28{29userId: 1,30id: 2,31title: 'Title Test 2',32body: 'Test2',33},34])35);36})37);3839beforeAll(() => server.listen());40afterEach(() => server.resetHandlers());41afterAll(() => server.close());4243describe('App', () => {44it('Renders the app and loads the posts', async () => {45render(<App />);4647userEvent.click(screen.getByText('Fetch Posts'));48expect(screen.getByRole('button')).toHaveTextContent('Loading ...');49expect(screen.getByRole('button')).toHaveAttribute('disabled');50await waitFor(() => screen.getByTestId('posts'));5152expect(screen.getAllByTestId('post')).toHaveLength(2);53expect(screen.getAllByTestId('post')[0]).toHaveTextContent('Title Test');54expect(screen.getAllByTestId('post')[1]).toHaveTextContent('Title Test 2');5556expect(screen.getByRole('button')).toHaveTextContent('Fetch Posts');57expect(screen.getByRole('button')).not.toHaveAttribute('disabled');58});5960it('Renders the app when there are no posts returned', async () => {61server.use(62rest.get(63'https://jsonplaceholder.typicode.com/posts',64(req, res, ctx) => {65// Here I mock the response to an empty array to test the behavior of my app when there are no posts to show.66return res(ctx.json([]));67}68)69);7071render(<App />);72userEvent.click(screen.getByText('Fetch Posts'));73expect(screen.getByRole('button')).toHaveTextContent('Loading ...');74expect(screen.getByRole('button')).toHaveAttribute('disabled');75await waitFor(() => screen.getByTestId('empty'));7677expect(screen.getByText('No Posts')).toBeInTheDocument();78});7980it('Renders the app when the posts do not load', async () => {81server.use(82rest.get(83'https://jsonplaceholder.typicode.com/posts',84(req, res, ctx) => {85// Here I mock the status of the response to 500 to validate that my app can handle errors gracefully.86return res(ctx.status(500));87}88)89);9091render(<App />);92userEvent.click(screen.getByText('Fetch Posts'));93expect(screen.getByRole('button')).toHaveTextContent('Loading ...');94expect(screen.getByRole('button')).toHaveAttribute('disabled');95await waitFor(() => screen.getByTestId('error'));9697expect(screen.getByText('Error :(')).toBeInTheDocument();98});99});
End to End testing
End-to-End tests, or also sometimes named e2e, are the set of tests that are the closest to what the user should experience when using your product. In most frameworks like Selenium or Cypress, an e2e test suite is nothing more than a scripted user flow that the computer will go through. Additionally, most of these tests will be executed **directly within a browser **which gives you the ability to validate whether your app runs properly on different browsers that your customers may use.
End to End tests have multiple pros and cons:
Pros:
- They are the most "realistic" set of tests: you run your tests against the built version of your frontend app in a browser.
- They validate whether your entire product works as expected, that includes the backend, APIs, the databases that might be involved, etc.
- They can surface latency issues (long loading times) and race conditions that your team and org might not have caught yet.
Cons:
- They are slow, complex, and expensive to run. As of today, e2e steps are the longest steps in most of my CI/CD pipelines. Additionally, they are very hard to maintain over time as your app becomes more complex, tests might become flaky, you might have to rewrite them completely to adapt to some new UX elements.
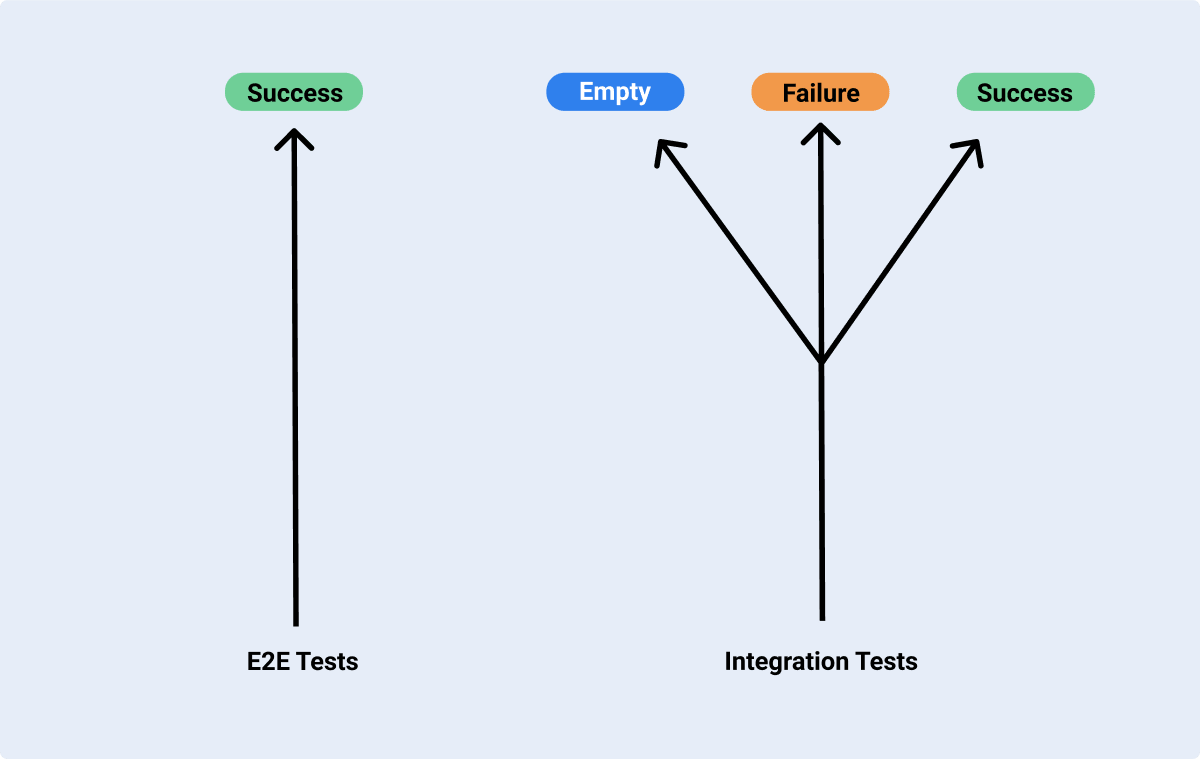
- You only test what I call the "Happy Path". For example, when running an e2e test against a form that sends data to an API, you can only test whether the case where things go as expected as this test depends on external APIs, backend services that here are not mocked and are supposed to work whereas with integration tests you can test empty states, success states and failure states:
If you haven't introduced e2e tests in your team just yet, I'd highly recommend **Cypress ** as a starting point. The Cypress team has built the most accessible way to write e2e tests to my eyes and also has the best documentation and community support.
Rather than showcasing some code snippets, I'd like to share with you some of my tips that I keep using for writing e2e tests:
- Each test should be self-contained. For a given suite with a test A, B, and C, the whole suite fails because test A failed might make it hard to find other issues with test B and C. I try to keep each test as independent as possible as it saves me time and effort when debugging a broken test.
- Trigger API calls before the test to create all the objects (todos, posts, ...) you need for your test. For a given object in your app, you might have a "create", "read", and "update" flow and I want to test all three of them. However, the "read" and "update" flow can't be self-contained if they depend on the "create" test being successful. Thus I tend to create custom commands to call the related APIs to create the objects I need before executing a test.
- Promote good test practices within your team, run them often (we'll get to that in the next part), fix them as soon as they break, gather a list of tests that you want to write, and prioritize them.
- If you currently have 0 e2e tests in your codebase and don't know which test to write first: start by writing a test that validates the most buggy or flaky feature in your app. This single test will have a positive impact on your product instantly. As stated earlier in this post, emphasize the impact of your CI/CD and tests by making the product better than it was before you wrote the test. Your organization and users will be more than thankful.
Accessibility tests and audits
This is the last and the most important piece of the CI/CD pipeline. Often enough it's also the most complicated because guaranteeing for your frontend project to be 100% accessible is no easy feat, but it's something that everyone should strive for.
Nothing is more efficient than sitting in front of your computer and using your app with a screen reader, however, here are some tools that can be run as part of an automated CI/CD pipeline that I use to guide the accessibility efforts:
- Lighthouse CI: This is a suite of tools to help you audit performance, accessibility, and whether your app follows best practices. I use this tool to essentially hold the line and ensure things do not get worse over time. It allows you to put together "performance and accessibility budgets" and thresholds. It will fail in case your score goes below the targetted budget. This probably deserves an entire article on its own, but in the meantime you can check their documentation that contains sample Github Workflows and easily integrate it into your CI/CD pipeline.
- Cypress Axe: This package works on top of Cypress and allows you to run a series of accessibility focused test suite. It helped me find some more complex accessibility issues that Lighthouse CI would skip. I wrote a blog post about Cypress Axe last year, and invite you to check it out if you want to learn more about it.
I also use a couple of chrome extensions to track and find new accessibility issues:
These, however, are purely used outside of my CI/CD pipeline, but I figured they were perhaps worth mentioning in this context.
Automation: When and how to run my tests and release
Now that we have written some unit, integration, e2e tests, and put in place the tooling to track accessibility issues, it's time to talk automation. The objective for your team should be to automate as much as possible, from running the tests to previewing the deployments, to deploying to production. The only manual step left in your CI/CD pipeline should be the code review. Automation is the key component of any High-Velocity development team.
Validate every code change
As of now, we know how to run these tests locally but we want to ensure that these tests can be run automatically every time a change occurs on the codebase.
I generally am in favor of running these tests on every pull request. Each change has to be tested before it's merged to the main branch without any exception. That is the secret to keep your project stable and bug-free: tests are run as often as possible, for every unit of change. Tests must pass for any code change to reach the main branch.
As my main tool for automation, I've been using Github CI, Actions and Workflows for both work-related and personal projects, and it has been working like a charm! Thus, I'm going to mainly focus on it in the upcoming part, and share some Github Workflow configurations as they are easy to read and thus very accessible to people who are new to that category of tools. Your team might be using other CI/CD services, like CircleCI, Jenkins or Google Cloud Build so you may have to do a little bit of investigation on your own when it comes to the actual configuration files needed, but the concepts stated below are still valid for those services.
Here is a sample Github Workflows that I'd typically use on several projects. If you do not have an automated CI/CD pipeline already in place you can use it to get started quickly and iterate over it, it integrates very well with Github PRs:
Example of Github Workflow that runs automated tests on every PR
1name: Linting Formatting Unit and Integration Tests23on:4pull_request:5branch:6- 'main' # This ensures these tests are run on pull requests that are open against the branch "main"78jobs:9validate-code-and-test:10runs-on: ubuntu-20.0411strategy:12matrix:13node: [12.x] # If your app or package needs to be tested on multiple versions of node, you can specify multiple versions here and your workflow will be run on each one of them14steps:15- name: Checkout Commit16uses: actions/checkout@v217with:18ref: ${{ github.event.pull_request.head.sha }}19- name: Use Node.js ${{ matrix.node }}20uses: actions/setup-node@v121with:22node: ${{ matrix.node }}23- name: Install Dependencies24run: |25yarn install --non-interactive26- name: Run Prettier27run: |28yarn format29- name: Run Lint30run: |31yarn lint32- name: Run Unit and Integration tests33run: |34yarn jest
Example of Github Workflow that runs e2e tests on every PR
1name: Linting - Formatting - Unit Tests - Integration23on:4pull_request:5branch:6- 'main' # This ensures these tests are run on pull requests that are open against the branch "main"78jobs:9build-and-e2e-tests:10runs-on: ubuntu-20.0411strategy:12containers: [1, 2, 3] # The Cypress lets you scale the number of containers to use to run your e2e tests. This will parallelize your test run and can help speeding up your CI/CD pipeline13matrix:14node: [12.x] # If your app or package needs to be tested on multiple versions of node, you can specify multiple versions here and your workflow will be run on each one of them15steps:16- name: Checkout Commit17uses: actions/checkout@v218with:19ref: ${{ github.event.pull_request.head.sha }}20- name: Use Node.js ${{ matrix.node }}21uses: actions/setup-node@v122with:23node: ${{ matrix.node }}24- name: Install Dependencies25run: |26yarn install --non-interactive27- name: Build UI28run: yarn build29env:30NODE_ENV: production # Don't forget to run your e2e tests against the production bundle of your app!31- name: Run E2E Tests32uses: cypress-io/github-action@v2.2.2 # The cypress team gives a pretty handy Github action. This is the easiest way to get your Cypress test working in a Github workflow!33with:34browser: chrome # Cypress now supports multiple browsers as well!35headless: true36parallel: true # Let Cypress know you want to run tests in parallel37start: yarn serve # You'll have to serve your own build files to run Cypress against your app. For that I simply add the NPM package called "serve".38wait-on: 'http://localhost:3000'39config: video=true,videoUploadOnPasses=false # You can pass a series of options here, I invite you to checkout the Cypress docs to learn more about them. Here I like to enable video recordings and disable them if the test passes. This gives me back videos that are then uploaded as artifacts, they help me debug failing tests and know exactly what happened.40- uses: actions/upload-artifact@v1 # In this step I tell the workflow to upload Cypress video recordings as workflow artifacts. They will be available to download on the Github UI.41if: always()42with:43name: cypress-videos44path: cypress/videos
Some resources you might find interesting regarding Github Workflows and Cypress:
- Once you have your CI/CD workflow established you may want to learn more about caching dependencies and build outputs.
Another thing I tend to run on every PR is preview deployments. These are perhaps my favorite feature of the whole CI/CD pipeline: you get a standalone deployment each PR that is accessible through a unique endpoint. Each deployment is a version of your frontend project with a specific change. This can not only help your team to speed up reviews, but it also lets your design and product team validate some new features easily. They shouldn't have to run your project on their computers to preview some changes: the review process should be as fast as possible and without roadblocks.
Releases
The last thing we want to automate is the release process. You do not want to have to run 20 scripts, manually, in a specific order, to get your application from your main branch to production. For this, I tend to favor having what I call a release branch in my Github repository and have the automated scripts run every time the main branch is merged on the release branch. You could also run the automated script on other events such as when you tag a release or you can even have scheduled deployments if your organization has a consistent release cadence. At this point, it depends on your team or your organization and how/when you want to do your release.
Here's a sample GitHub Action that runs a script (a placeholder in this case, you will have to replace it with your own) following a push event on a release branch:
Example of Release Github Workflow
1name: Build and Deploy to Production23on:4push:5branches:6- 'production' # Any push on the production branch will trigger this workflow7jobs:8build-and-deploy:9runs-on: ubuntu-20.0410strategy:11matrix:12node: [12.x] # If your app or package needs to be built on multiple versions of node, you can specify multiple versions here and your workflow will be run on each one of them13steps:14- name: Checkout Commit15uses: actions/checkout@v216with:17ref: ${{ github.event.pull_request.head.sha }}18- name: Use Node.js ${{ matrix.node }}19uses: actions/setup-node@v120with:21node: ${{ matrix.node }}22- name: Install Dependencies23run: |24yarn install --non-interactive25- name: Build UI26run: yarn build27env:28NODE_ENV: production29- name: Deploy to production30run: yarn deploy:production31env: SOME_TOKEN_TO_DEPLOY=${{ secrets.MY_PRODUCTION_TOKEN }} # Never expose tokens! Github has a very handy secrets feature that can store your tokens securely, and allows them to be used in any workflow!
Another essential point regarding releases is that, once you automate them, you should do releases as often as possible. By increasing the cadence of production deployments you limit the scope of each deployment. This in return limits the number of issues that could impact your user. On top of that, you can add **Feature Flags, **to allow **a slow rollout **of a big new feature. This also helps you mitigate any potential problems that a massive change could create once deployed to production and also gives you even more control over the release of a new feature. I especially like feature flags because they also provide a better experience for the end-user, the rollouts are smoother and can be more targetted: you may only want to enable a given feature to a subset of user before making it generally available.
Conclusion
This article contains all the concepts, tools, and knowledge I use daily to ship software without sweating. I know that it is pretty dense and that there's a lot to take in, but really if you implement each of these steps and concepts in your project I can ensure you that this will enable you, your team and your organization to do the best work you've ever done.
Below you'll find a couple of extra links that I found useful when learning about tests and CI/CD. Some of them are blog posts, some of them are classes, I found them all very valuable and I'm sure they would help you in your journey to build a high-velocity development environment and make you and your team unstoppable.
Resources: