How I got started with Kubernetes on GKE
Disclaimer: I work at Docker but I wasn’t asked to write or publish this post. Here I’m simply sharing how I moved my own non-work related micro-services (i.e. portfolio, small projects) from a pure Docker based platform to Google Kubernetes Engine.
My personal projects needed a new place to live, so I decided to take this as an opportunity to learn more about Kubernetes while migrating them to Google Kubernetes Engine. After a few weeks of investigation, I ended up with a pretty good setup that allows me to deploy, publish and scale my portfolio, website, and any other project that I want to host, and all of this with SSL certificates with Let’s Encrypt. In this post, I want to share my step by step guide so you too can learn about Kubernetes and have an easy and efficient way to deploy your projects.
Note: This post assumes you have basic knowledge about Docker and containers, as well as Docker for Mac or Docker for Windows installed on your machine with the Kubernetes option turned on.
For this part, we’ll focus on installing both gcloud tools and setting up your first GKE cluster. You can go through this guide for the setup of gcloud tools on your local CLI. After creating an account on GKE, the first step will be to create a cluster. To do so, we can simply go through the GKE GUI, hit the “Create Cluster” button and go through the wizard. Now that we have a cluster, let’s get its credentials so we can set the Kubernetes context to this cluster in our local CLI. To do that we can run:
gcloud command to get the credentials of an existing cluster
1gcloud container clusters get-credentials CLUSTER --zone ZONE --project PROJECT
where CLUSTER is the name of the cluster andZONE the zone we’ve picked up while filling the wizard, and PROJECT the ID of our project.
After this, in our Docker for Mac menu, we should be able to see the name of our cluster in the context list under “Kubernetes”:
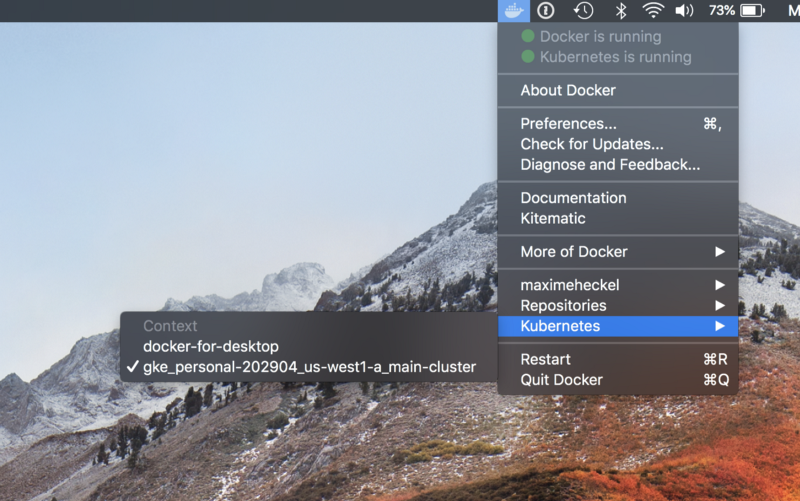
If we click on it, all of the following Kubernetes commands we execute will be run against our GKE cluster. For example, if we try running kubectl get pods, we should see that we have no resources on this cluster (yet).
Next, we’ll deploy our first workloads on our GKE clusters. If you’re new to Kubernetes, this is the moment when things get a bit tricky but I’ll do my best to get you up to speed with the required vocabulary. Here are the different types of workloads that we’ll deploy on our cluster:
- Pod: A group of running containers. It’s the smallest and simplest Kubernetes object we’ll work with.
- Deployment: A Kubernetes object that manages replicas of Pods.
- Service: A Kubernetes object that describes ports, load balancers, and how to access applications.
- Ingress: A Kubernetes object that manages external access to the services in a cluster via HTTP.
If you still don’t feel confidant enough, I’d recommend checking this great tutorial to get you started with the basics: https://kubernetes.io/docs/tutorials/kubernetes-basics/.
Kubernetes workloads are usually described with YAML files, which can be organized pretty much however we want. We can even multiple types of Kubernetes workloads in a single YAML file.
As an example, here’s a YAML file containing the definition of the first workloads we’ll deploy on our Kubernetes cluster:
Kubernetes deployment
1apiVersion: apps/v1beta12kind: Deployment3metadata:4name: website5spec:6selector:7matchLabels:8app: website9replicas: 1 # For now we declare only one replica10template: # We define pods within this field in our deployment11metadata:12labels:13app: website14spec:15containers:16- name: website17image: nginx:latest18imagePullPolicy: "Always"19ports:20- containerPort: 80 # The nginx container exposes port 802122---2324apiVersion: v125kind: Service26metadata:27name: website28labels:29run: website30spec:31type: NodePort32ports:33- port: 8000 # On which port you want to publish the website dep34targetPort: 80 # The port exposed by your container35protocol: TCP36selector:37app: website
Note: I was very confused the first time I deployed this workload by the service “type” field, then I read this amazing article which made it all clear to me: https://medium.com/@pczarkowski/kubernetes-services-exposed-86d45c994521
Let’s save the above file on our machine and deploy these workloads by running: kubectl apply -f PATH/FILENAME.yml. The deployment shouldn’t take more than a few seconds, and then we can verify that all our workloads are actually deployed. Run kubectl get TYPE, where type is any of the Kubernetes types we defined above, e.g. kubectl get pods, to list any Kubernetes workloads of a given type. If you want to know more about them you can run kubectl describe TYPE NAME, e.g. kubectl describe service website.
By listing the services we should end up with an output similar to this:
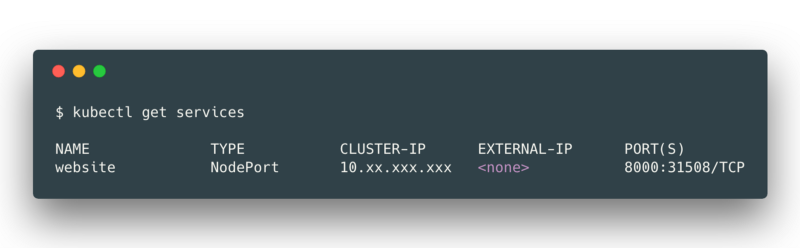
We can see that the port 8000 of our service is mapped to the port **31508** of one of our node in our cluster, however GKE nodes are not externally accessible by default, so our website service is not (yet) accessible from the Internet. This is where Ingresses comes into the picture.
Here, we’ll create an Ingress to access our website service from the Internet. An Ingress workload basically contains a set of rules to route traffic to our service.
For example, we can paste the following in a file called ingress.yml:
Ingress YAML definition
1apiVersion: extensions/v1beta12kind: Ingress3metadata:4name: main-ingress5spec:6backend:7serviceName: website8servicePort: 8000
If we run kubectl apply -f ingress.yml, we create a rule to route all external HTTP traffic hitting our Ingress external IP to our website. If we wait a few minutes, we’ll see that running kubectl get ingress will output a list containing main-ingress with an external IP:
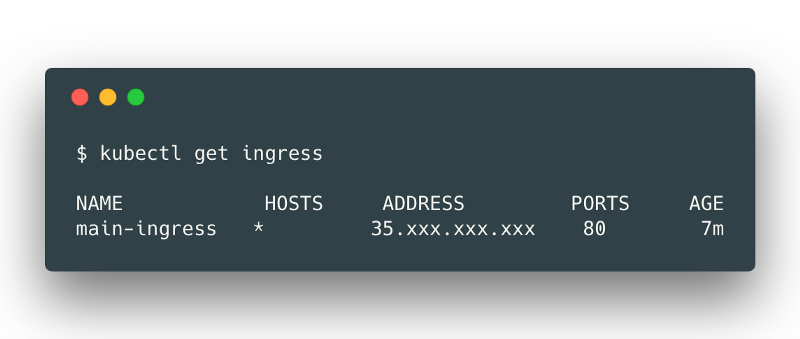
Accessing the external IP from your browser should show you the main NGINX page! We just deployed, exposed and published our first Kubernetes workload!
But wait there’s more: we can actually use this ingress to do load balancing, by adding more specific rules. Let’s say we only want our domain myawesomedomain.com to access our website service, we can add a set of rules:
Ingress YAMLK definition with loadbalancing in mind
1apiVersion: extensions/v1beta12kind: Ingress3metadata:4name: main-ingress5spec:6rules:7- host: myawesomedomain.com8http:9paths:10- backend:11serviceName: website12servicePort: 8000
Now if we run kubectl apply -f ingress.yml after saving the content above in our ingress.yml file and point our domain name myawesomedomain.com to the external IP of our Ingress, you’ll be able to access your website service with this domain.
Ingresses come very handy when you have multiple services to host on the same cluster. The ingress.yml file I’m currently using on for my personal projects looks something like this:
Ingress YAMLK definition with loadbalancing in mind
1apiVersion: extensions/v1beta12kind: Ingress3metadata:4name: main-ingress5spec:6rules:7- host: myawesomedomain.com8http:9paths:10- backend:11serviceName: website12servicePort: 800013- host: test.myawesomedomain.com14http:15paths:16- backend:17serviceName: testwebsite18servicePort: 800019- host: hello.myawesomedomain.com20http:21paths:22- backend:23serviceName: hello24servicePort: 9000
Thanks to our Ingress, we have now an easy way to route traffic to specific services by simply declaring rules in a YAML file and deploying it on our cluster.
Now that we have our Kubernetes services published, the next step is to have SSL Certificates working for our services. That is being able to reach [https://myawesomedomain.com](https://myawesomedomain.com,), [https://test.myawesomedomain.com](https://test.myawesomedomain.com), etc. On my previous micro-services host, I was running a home made containerized version of HAProxy that would query my Let’s Encrypt certificates (they are free!) and renew them for me all by itself. Pretty handy since I didn’t want to bother manually renewing them every 90 days.
I had to look a around for quite a bit and try several projects such as the now deprecated kube-lego, before ending up with a solution that worked for me: kube-cert-manager. This project is doing exactly what I needed: “Automatically provision and manage TLS certificates in Kubernetes”.
As a first step we’ll need to deploy a NGINX-Ingress-Controller for GKE. This Ingress Controller will basically consume any Ingress workload and route its incoming traffic. After cloning the repository we’ll need to do the following:
- Edit
cluster-admin.ymlto add our email address in the `<YOUR-GCLOUD-USER>placeholder. - Run
cd gke-nginx-ingress-controller && ./deploy.sh
We now have a service of type Load Balancer, which is listenning for all the incoming traffic on port 80 (for HTTP traffic) and 443 (for HTTPS traffic) with an external IP address. It will use all of the Ingresses on our cluster to route traffic, including our main-ingress.
Then, we’ll need to deploy kube-cert-manager. Just like we did for the Ingress Controller, we’ll have to do some edits before deploying the project:
- Create the
kube-cert-manager-googlesecret (for this I just followed the README in the repository) - Edit
kube-cert-manager-deployment.ymland fill the different fields such as your email and the DNS provider. The documentations about DNS provider is available here. In my case, my domain was managed by Dnsimple so I had to edit the deployment file like this:
kube-cert-manager-deployment.yml with env variables setup
1containers:2- name: kube-cert-manager3env:4- name: DNSIMPLE_BASE_URL5value: [https://api.dnsimple.com](https://api.dnsimple.com)6- name: DNSIMPLE_OAUTH_TOKEN7value: myrequestedoauthtoken
Finally, runningcd gke-kube-cert-manager && ./deploy.sh will setup and deploy cert-manager on your cluster.
Now here’s the fun part: all this setup allows us to create a Certificate Kubernetes workload. Any certificate created on this cluster will be picked up and requested (and renewed) by the kube-cert-manager deployment. Let’s create one for myawesomedomain.com in a file called certificates.yml:
Certificate YAML definition
1apiVersion: 'stable.k8s.psg.io/v1'2kind: 'Certificate'3metadata:4name: website5namespace: default6labels:7stable.k8s.psg.io/kcm.class: 'kube-cert-manager'8spec:9domain: 'myawesomedomain.com'
Running kubectl apply -f certificates.yml will submit the request to Let’s Encrypt and create a TLS secret for our NGINX Ingress Controller to use. We can check the logs of the kube-cert-manager Pod with kubectl logs -f nameofyourcertmanagerpodpod during the request, and if everything goes well, we should see logs like this:
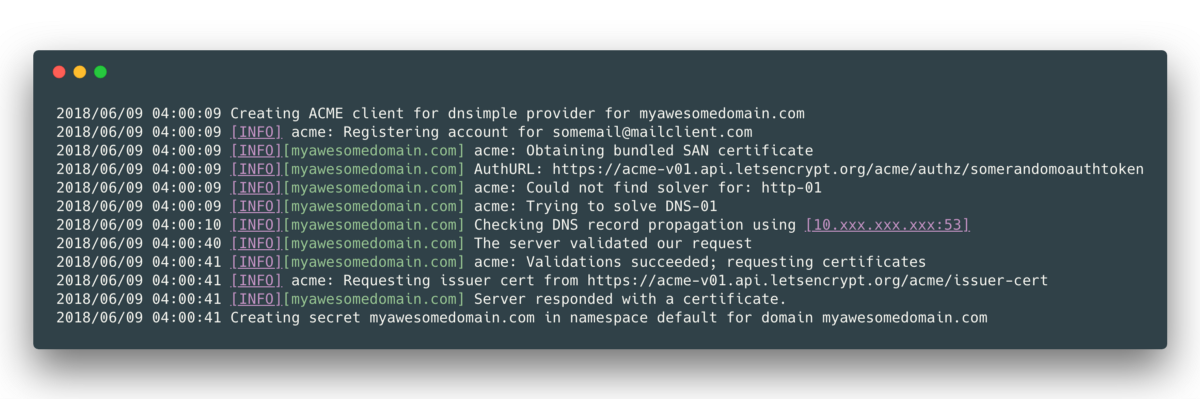
After a few minutes we should have, as shown in the logs above, a secret titled myawesomedomain.com on our cluster. Let’s run kubectl get secrets to ensure it’s there before continuing. Finally, we can now edit our ingress.yml file as such to include our certificate:
Updated Ingress definition with certificate for a given domain passed as a secret
1apiVersion: extensions/v1beta12kind: Ingress3metadata:4name: main-ingress5annotations:6kubernetes.io/ingress.class: 'nginx'7spec:8rules:9- host: myawesomedomain.com10http:11paths:12- backend:13serviceName: website14servicePort: 800015tls:1617- secretName: myawesomedomain.com18hosts:19- myawesomedomain.com
Now, let’s run kubectl apply -f ingress.yml to update our main-ingress to support the secret we created earlier. Then, we just need to make sure myawesomedomain.com points to the external IP of our NGINX Ingress Controller, and after a while our website service will be accessible through HTTPS!
We can see that at this point we have a pretty solid and simple way to add new services on our cluster, scale them, route traffic to them thanks to what we learned in part II and III, and add certificates to their corresponding domains by requesting them and renewing them automatically thanks to kube-cert-manager.
Resources I used while getting started with Kubernetes