Building a Vaporwave scene with Three.js
After spending months in my backlog of things to explore, I finally made the jump and started learning Three.js 🎉. I've followed the Three.js journey course from @bruno_simon for a few weeks now, and it's been an eye-opener. It feels like it just unlocked a new realm of possibilities for me to spend time doing more creative coding.
While going through the course, there was a moment where I felt that I needed to explore and build something on my own to apply what I've learned.


Day 1: @0xca0a 's https://t.co/YCiA05AdL0 great intro to React Three Fiber Day 2-4: @bruno_simon 's Three.js Journey (50% done) Day 5: First case study: Rebuilding a scene that I like a lot by simply guessing, and applying what I learned ⚡️ Will write up about all that soon 👀
One project I had in mind was to reverse-engineer the WebGL animation from Linear's 2021 release page and try rebuilding it to see how close I could get from the source material. Since I saw this scene on my timeline last June, I've been a bit obsessed with it. I absolutely love the vaporwave/outrun vibe of this animation and I think the developers and designers involved in this project did an incredible job 👏✨. On top of that, this scene happens to touch upon a wide range of key Three.js concepts which was perfect as a first project!
In this blog post, we're going to take a look at the thought process and the steps I took to rebuild this vaporwave Three.js scene by using nothing but fundamental constructs that I recently learned. If you do not want to wait until the end of this article to see the result, you can head over to https://linear-vaporwave-three-js.vercel.app/ to get a nice preview 😛.
I added editable code snippets with their corresponding rendered scene (including comments) throughout the article for each key step of this project. You will be invited to modify them and observe how some of the changes impact the final render of the Three.js scene 😄.
Setting up the scene
First, we need to do some initial setup to have everything we need to build our scene. To render a Three.js scene, you need the following key elements:
- A scene
- A Mesh, with both a material and a geometry.
- A camera
- A renderer
- Some event listeners for resizing and animations
Basic Three.js scene
1import * as THREE from 'three';2import { OrbitControls } from 'three/examples/jsm/controls/OrbitControls.js';34const canvas = document.querySelector('canvas.webgl');56// Scene7const scene = new THREE.Scene();89// Objects10/**11* Here I use a Plane Geometry of width 1 and height 212* It's also subdivided into 24 square along the width and the height13* which adds more vertices and edges to play with when we'll build our terrain14*/15const geometry = new THREE.PlaneGeometry(1, 2, 24, 24);16const material = new THREE.MeshBasicMaterial({17color: 0xffffff,18});1920const plane = new THREE.Mesh(geometry, material);2122// Here we position our plane flat in front of the camera23plane.rotation.x = -Math.PI * 0.5;24plane.position.y = 0.0;25plane.position.z = 0.15;2627scene.add(plane);2829// Sizes30const sizes = {31width: window.innerWidth,32height: window.innerHeight,33};3435// Camera36const camera = new THREE.PerspectiveCamera(37// field of view3875,39// aspect ratio40sizes.width / sizes.height,41// near plane: it's low since we want our mesh to be visible even from very close420.01,43// far plane: how far we're rendering442045);4647// Position the camera a bit higher on the y axis and a bit further back from the center48camera.position.x = 0;49camera.position.y = 0.06;50camera.position.z = 1.1;5152// Controls53// These are custom controls I like using for dev: we can drag/rotate the scene easily54const controls = new OrbitControls(camera, canvas);55controls.enableDamping = true;5657// Renderer58const renderer = new THREE.WebGLRenderer({59canvas: canvas,60});61renderer.setSize(sizes.width, sizes.height);62renderer.setPixelRatio(Math.min(window.devicePixelRatio, 2));6364// Event listener to handle screen resize65window.addEventListener('resize', () => {66// Update sizes67sizes.width = window.innerWidth;68sizes.height = window.innerHeight;6970// Update camera's aspect ratio and projection matrix71camera.aspect = sizes.width / sizes.height;72camera.updateProjectionMatrix();7374// Update renderer75renderer.setSize(sizes.width, sizes.height);76// Note: We set the pixel ratio of the renderer to at most 277renderer.setPixelRatio(Math.min(window.devicePixelRatio, 2));78});7980// Animate: we call this tick function on every frame81const tick = () => {82// Update controls83controls.update();8485// Update the rendered scene86renderer.render(scene, camera);8788// Call tick again on the next frame89window.requestAnimationFrame(tick);90};9192// Calling tick will initiate the rendering of the scene93tick();
I know..., it can feel a bit overwhelming. But don't worry! Let's take some time to break down each one of these elements.
How to define a Three.js scene
1// Canvas code...23// Scene4const scene = new THREE.Scene();56// Objects code...
First, we have the scene. This is the container that holds the objects we will render.
How to define a Three.js mesh
1// Scene code...23// Objects4const geometry = new THREE.PlaneGeometry(1, 2, 24, 24);5const material = new THREE.MeshBasicMaterial({6color: 0xffffff,7});89const plane = new THREE.Mesh(geometry, material);1011// Sizes code...
Then we define the objects that will be added to our scene. For our project, we only have one: just a simple plane. I chose to start with a plane because we're working on a landscape. There are, of course, many other geometries available but we won't need any other for our vaporwave scene.
A Three.js object is always defined using 2 key elements:
- Geometry: the shape of our object. Here we use the Three.js
PlaneGeometrywhich represents a plane. I gave it a width of 1 "unit", and a height of 2 "units" on purpose because I want this plane where our landscape will be rendered to feel "long". It's also subdivided in 24 segments on its width and height, this is to give us more vertices to play with and let us shape our plane with a bit more detail. - Material: how the object looks. Here I used the
MeshBasicMaterialwhich is the simplest material you can use inThree.js. In this case, I set the color to white so our plane will be white in our scene
By combining the geometry and the material you get our object which is also called a mesh.
How to define a Three.js camera
1// Sizes code...23// Camera4const camera = new THREE.PerspectiveCamera(5// field of view675,7// aspect ratio8sizes.width / sizes.height,9// near plane: it's low since we want our mesh to be visible even from very close100.01,11// far plane: how far we're rendering122013);1415// Position the camera a bit higher on the y axis and a bit further back from the center16camera.position.x = 0;17camera.position.y = 0.06;18camera.position.z = 1.1;1920// Controls code...
Here we define our camera, an object representing the point of view we have in our scene. I positioned it close to the ground camera.position.y = 0.06 and a bit further from the center of the scene camera.position.z = 1.1 to get a point of view similar to the one from the original scene.
How to define a Three.js renderer and handle resize
1// Controls code...23// Renderer4const renderer = new THREE.WebGLRenderer({5canvas: canvas,6});7renderer.setSize(sizes.width, sizes.height);8renderer.setPixelRatio(Math.min(window.devicePixelRatio, 2));910// Event listener to handle screen resize11window.addEventListener('resize', () => {12// Update sizes13sizes.width = window.innerWidth;14sizes.height = window.innerHeight;1516// Update camera's aspect ratio and projection matrix17camera.aspect = sizes.width / sizes.height;18camera.updateProjectionMatrix();1920// Update renderer21renderer.setSize(sizes.width, sizes.height);22// Note: We set the pixel ratio of the renderer to at most 223renderer.setPixelRatio(Math.min(window.devicePixelRatio, 2));24});2526// Animate code...
The renderer will render/draw our scene onto an HTML canvas. It's a tool that uses the camera set up earlier to get snapshots of our scene and display it on the page. It needs to be updated on window resize so the scene can render properly no matter the size of the viewport.
How to define a tick function to handle animations in Three.js
1// Renderer and resize handler code...23// Animate: we call this tick function on every frame4const tick = () => {5// Update controls6controls.update();78// Update the rendered scene9renderer.render(scene, camera);1011// Call tick again on the next frame12window.requestAnimationFrame(tick);13};1415// Calling tick will initiate the rendering of the scene16tick();
The tick function will handle animations and camera movements in our scene. It's executed on every frame thanks to the use of requestAnimationFrame. Right now, it only handles our OrbitControls: a Three.js utility that lets us use the mouse to grab and move the scene around, which I use a lot when building a scene to look at it from any angle. We'll use it later to handle anything related to animation ✨.
Building the terrain
We now have the base for our scene: a flat plane. Before we start working with it, we have to take a closer look at the Linear release page WebGL animation and deconstruct the scene to know what we'll need to do to achieve a similar render.
Deconstructing the original scene
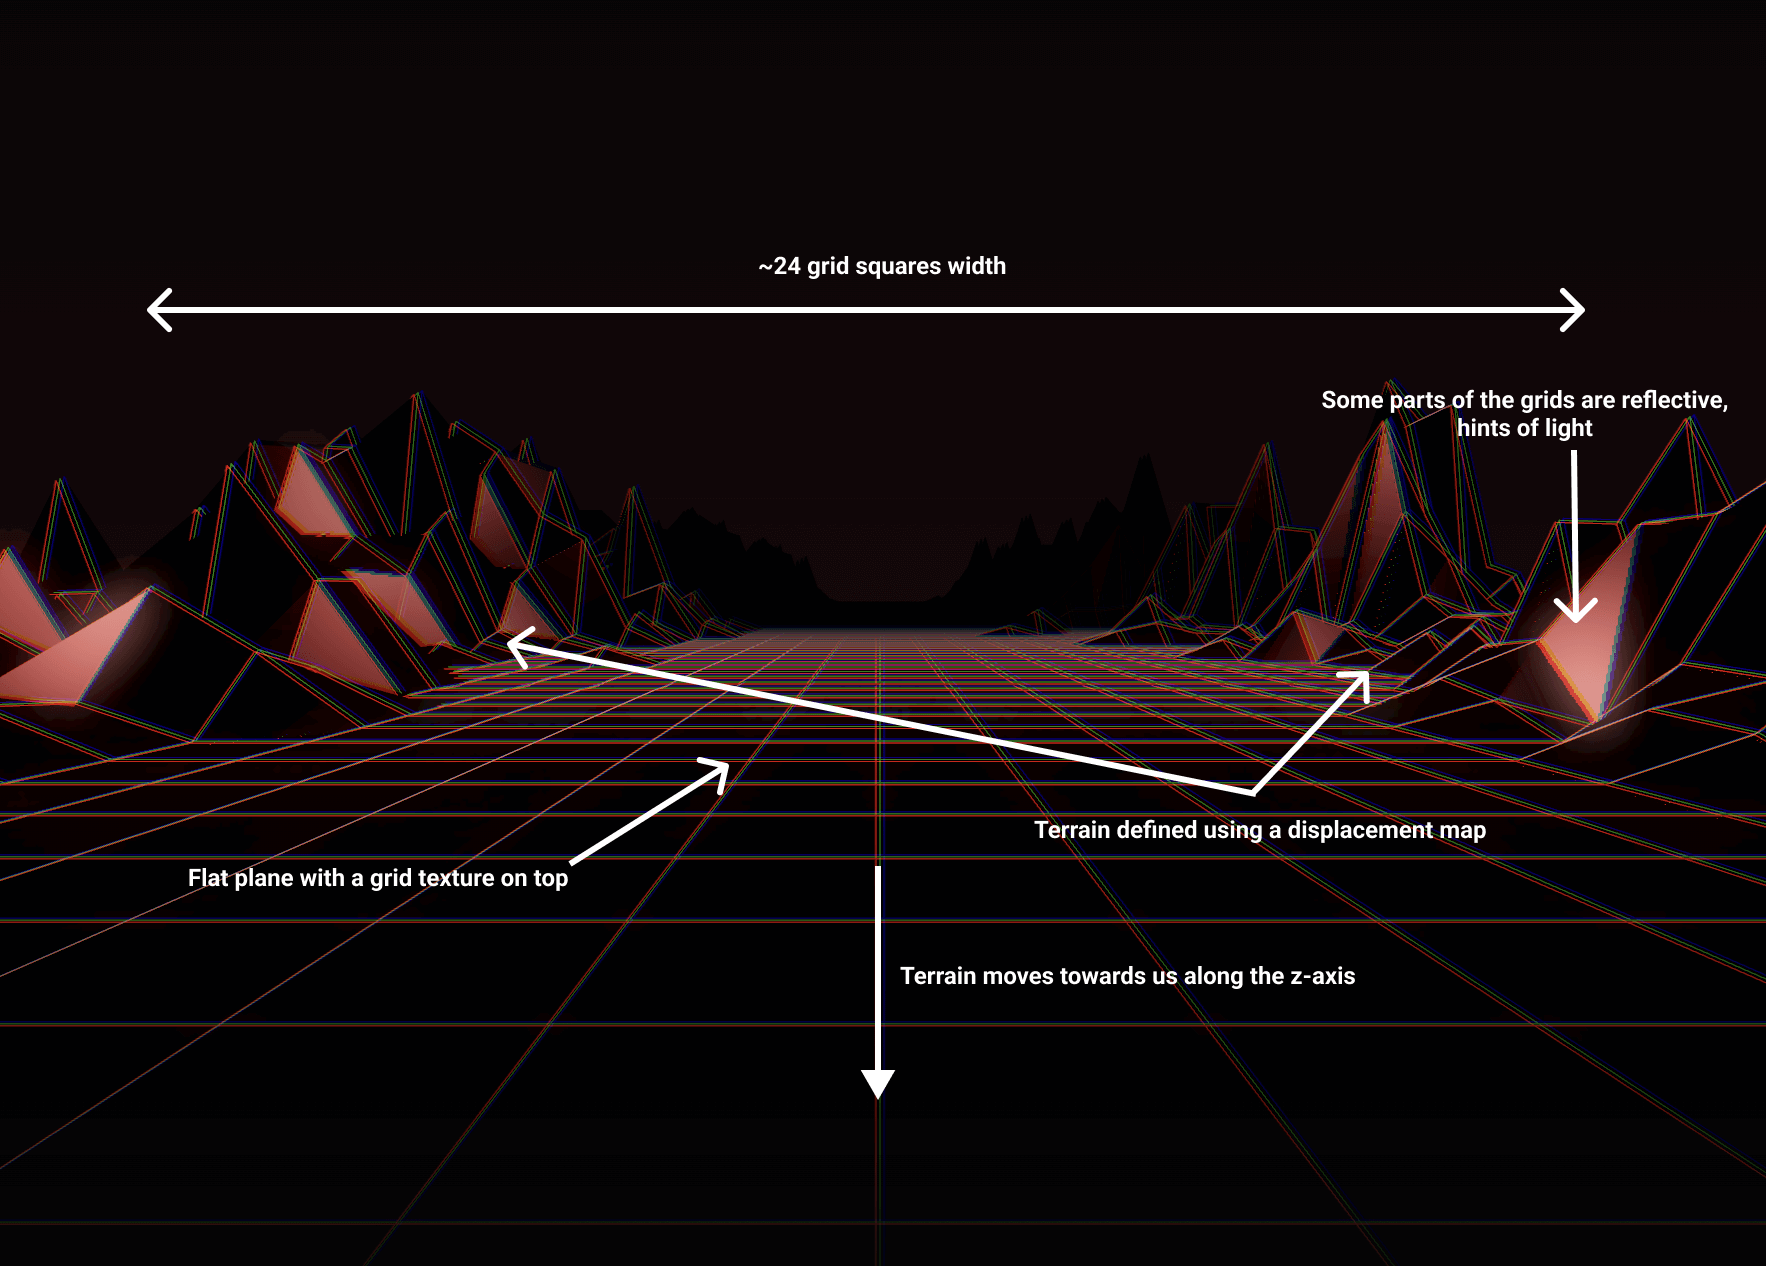
Above, you can see the annotations I wrote down when I started working on this project. Most of the decisions I've made regarding the implementation details have been made from my own observations of this scene, so the following is just here to illustrate my train of thought:
- The plane will need a texture to draw the grid on top of it
- The plane will need to have some displacement to shape the terrain on the sides
- The terrain is very low-poly and seems to match with the grid texture. Thus, we can have as many "squares" in our grid as subdivisions of our plane (I counted 24, but this might be very wrong 😅). So, no matter how we shape our terrain, the intersections of the segments of our grid texture will match the position of the vertices of the plane giving it its distinct vaporwave look
- The surface is a bit shiny in some areas so we'll need to put a red-ish light behind the camera and tweak the material of our mesh
- The terrain moves towards us (the viewer), so we'll animate the position of our plane along the z-axis
Now that we've analyzed our scene we can start building 🤘.
Texture
First and foremost, let's make our PlaneGeometry look more like the final render. We can see from the Linear scene that the terrain is mostly some kind of grid. To achieve that effect we will need to do 3 things:
- Draw the grid and export it as a
.jpgor `` on a software like Figma for example - Load this file as a texture in our scene
- Put that texture on our plane, and voilà ✨ we'll have our vaporwave grid effect!
It may sound complicated at first, but Three.js makes it very easy to do so in just a few lines of code with the textureLoader class.
How to load a texture with Three.js
1// Instantiate the texture loader2const textureLoader = new THREE.TextureLoader();3// Load a texture from a given path using the texture loader4const gridTexture = textureLoader.load(TEXTURE_PATH);
After loading the texture, we then apply it on the plane by assigning the texture to the map property of the material, and we get something like this:
Terrain
We can now focus on the terrain. We want to create some steep mountains on each side of the plane but keep the middle of the plane flat. How can we do that?
First, we need to change our material. So far we only used the MeshBasicMaterial which is, like its name indicates, basic. We need a more advanced material such as MeshStandardMaterial which allows us to play a bit more with it:
- it's physically based, meaning it's more realistic and can interact with light
- we can edit the different vertices, thus changing the "shape" of the Mesh. This is the property we need now to make our terrain.
However, if you go to the playground above and change the material and refresh the preview, you might notice that the scene becomes all of a sudden dark. This is because, unlike the MeshBasicMaterial, the MeshStandardMaterial needs light to show up on the screen.
To fix this, I added a white ambientLight, a simple light that emits in every direction in the playground below. Try to comment in and out the code for the light of this scene to see the effect:
Now that we have our material set up we need to shape the terrain by displacing the vertices of the material of our mesh. With Three.js we can do that by providing another texture: a displacement map. Once applied to the displacementMap property of a material, this texture will tell our renderer at which height the points of our material are.
Here's the displacement map (also called "heightmap") I provided to this scene:

We can import our displacement map the same way we previously imported our grid texture: using a textureLoader. On top of that, Three.js lets you specify a displacementScale: the intensity with which the displacement map affects the mesh. I used a value of 0.4, which I got by simply tweaking until it felt right.
We can now see the terrain for our scene taking shape ✨:
Animating the scene
We're getting closer! We now have a scene containing our terrain with the proper texture. It's now time to look into some Three.js animation patterns to make our scene move.
Animation patterns and Frame Rate
When we deconstructed the Linear WebGL animation we saw that the terrain is moving towards us. Thus to get that effect in our own scene we'll need to move our mesh along the z-axis. You will see, it's actually pretty simple 😄!
We talked earlier when setting the scene about the tick function. This is the function that gets called again and again, on every frame. To make our terrain move, we'll increment the position of our mesh along the z-axis on every frame.
So to make our terrain move, we need to increment our Mesh z position relative to the elapsed time like below:
Making our terrain move along the z-axis in the tick function
1// Renderer and resize handler code...2// Instantiate the Three.js Clock3const clock = new THREE.Clock();45// Animate6const tick = () => {7// Get the elapsedTime since the scene rendered from the clock8const elapsedTime = clock.getElapsedTime();910// Update controls11controls.update();1213// Increase the position of the plane along the z axis14// (Multiply by 0.15 here to "slow down" the animation)15plane.position.z = elapsedTime * 0.15;1617// Render18renderer.render(scene, camera);1920// Call tick again on the next frame21window.requestAnimationFrame(tick);22};
Making the scene endless
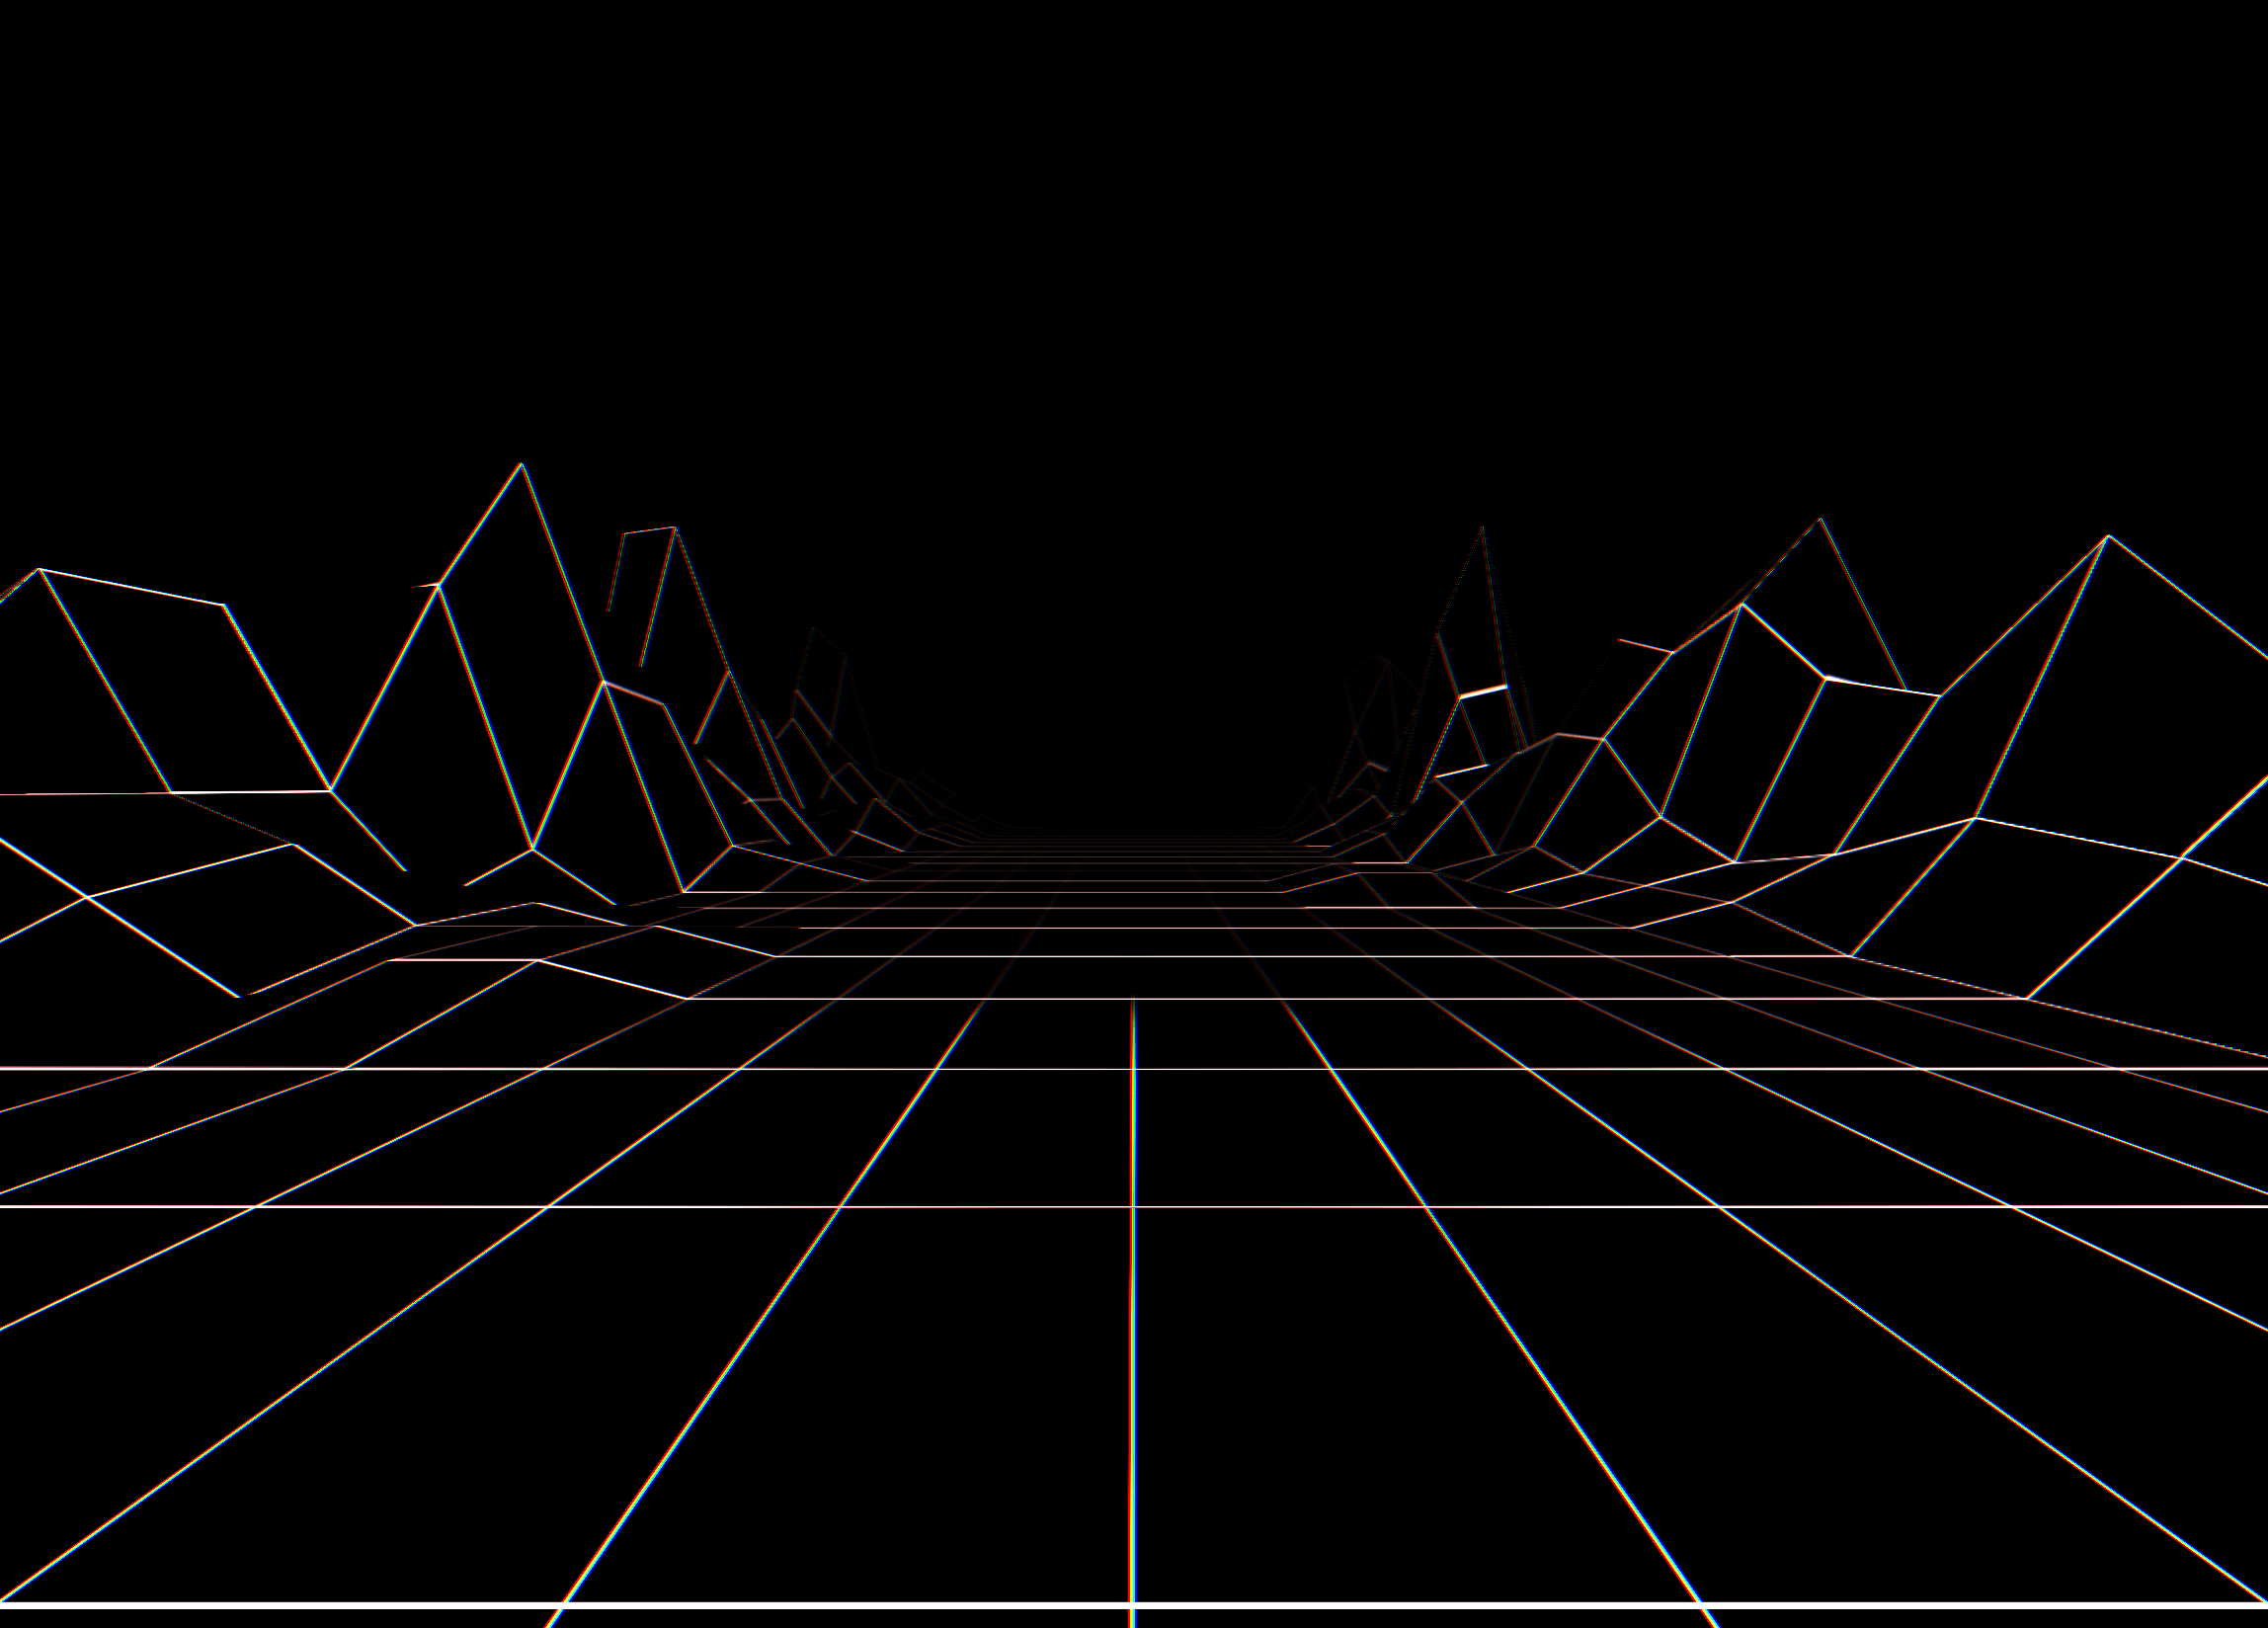
You will notice that there's one issue with our scene now: the plane moves towards us, but since its length is finite, we don't see anything after a few seconds 😅:
We have to find a way to give the user the impression that this terrain goes on forever. For obvious reasons, we can't make our terrain infinite, it's just impossible, but we can use a few tricks!
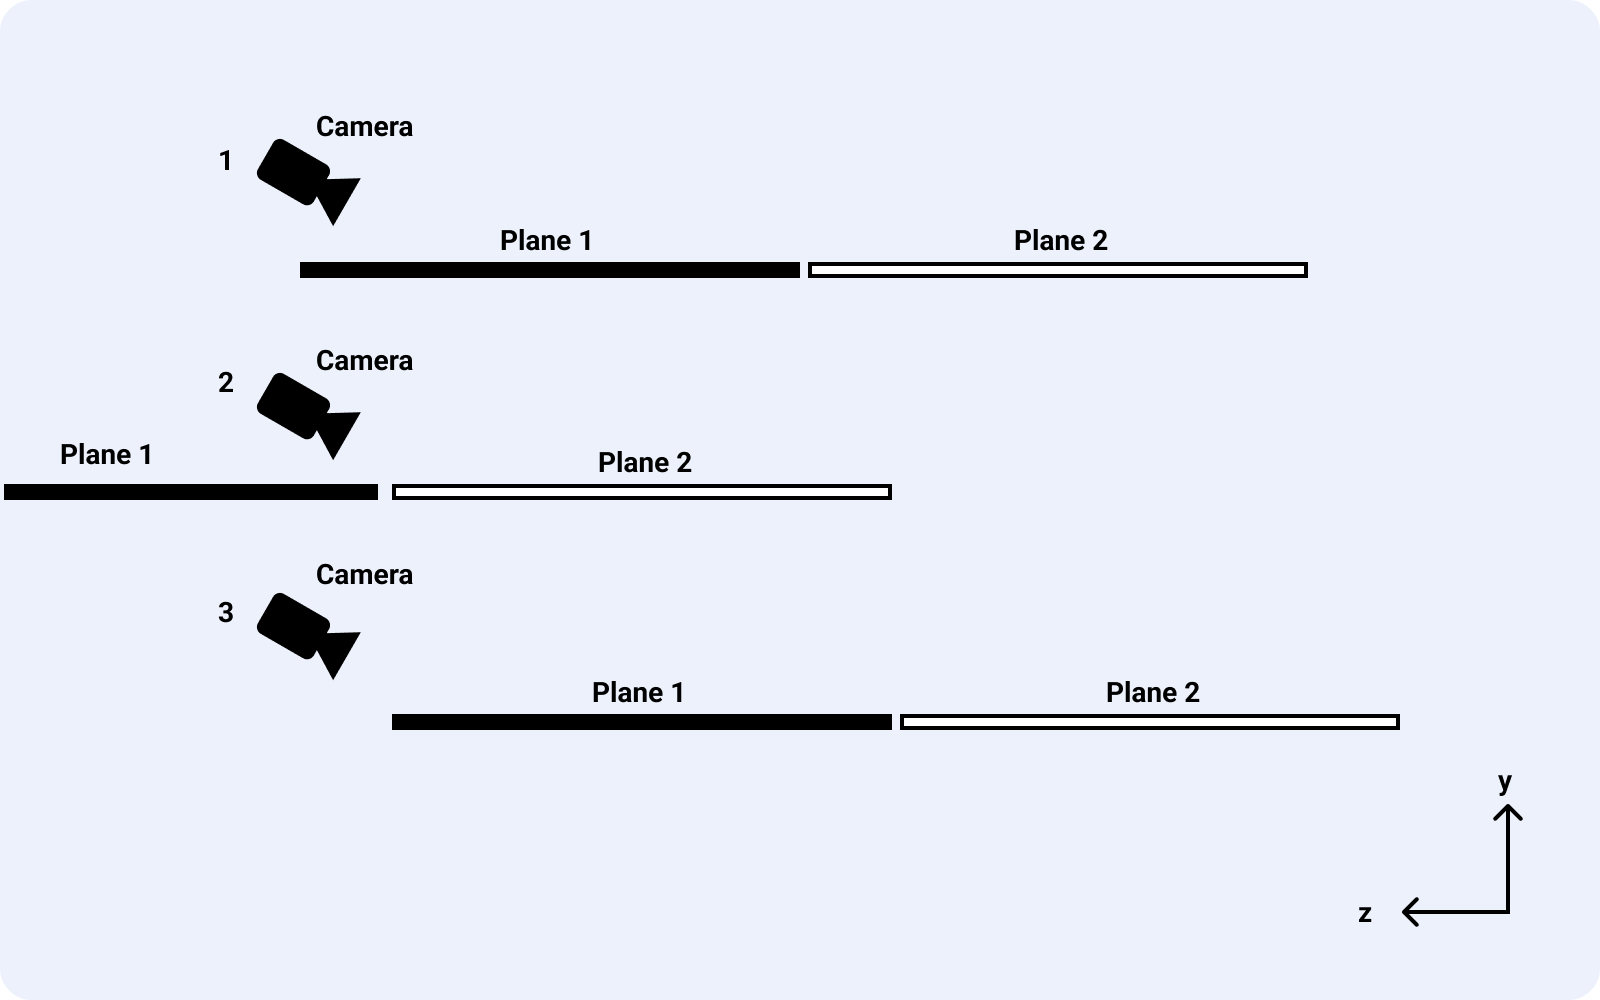
- We can add a second copy of our plane, put it behind the first one and make it move towards us as well
- Once the first plane has gone past our camera (just behind it), the second plane will be at the same position as the first one was at the beginning of the transition
- We can now reset both planes to their original position, respectively
z=0andz=-2, without the viewer noticing. - Our animation will thus feel infinite. Plus our terrain looks organic enough that it's not too obvious that we keep reusing the same plane 😄
Implementing this effect requires just a few lines of code (and some math):
Animating our terrain to make it look endless
1// Renderer and resize handler code...23const clock = new THREE.Clock();45// Animate6const tick = () => {7const elapsedTime = clock.getElapsedTime();8// Update controls9controls.update();1011/**12* When the first plane reaches a position of z = 213* we reset it to 0, its initial position14*/15plane.position.z = (elapsedTime * 0.15) % 2;16/**17* When the first plane reaches a position of z = 018* we reset it to -2, its initial position19*/20plane2.position.z = ((elapsedTime * 0.15) % 2) - 2;2122// Render23renderer.render(scene, camera);2425// Call tick again on the next frame26window.requestAnimationFrame(tick);27};
Let's add this code to our tick function to see the magic happen ✨:
We did it! 🎉 We managed to animate our scene in an infinite loop and we're slowly getting closer to Linear's original scene. However, there're still a few details to add.
Adding post-processing effects
As you can see from the previous playground, our terrain looks a bit off compared to what the Linear team came up with. I didn't really know what it was at first, it was almost as if our terrain looked too sharp. However, after looking at the original scene very closely I noticed the following:
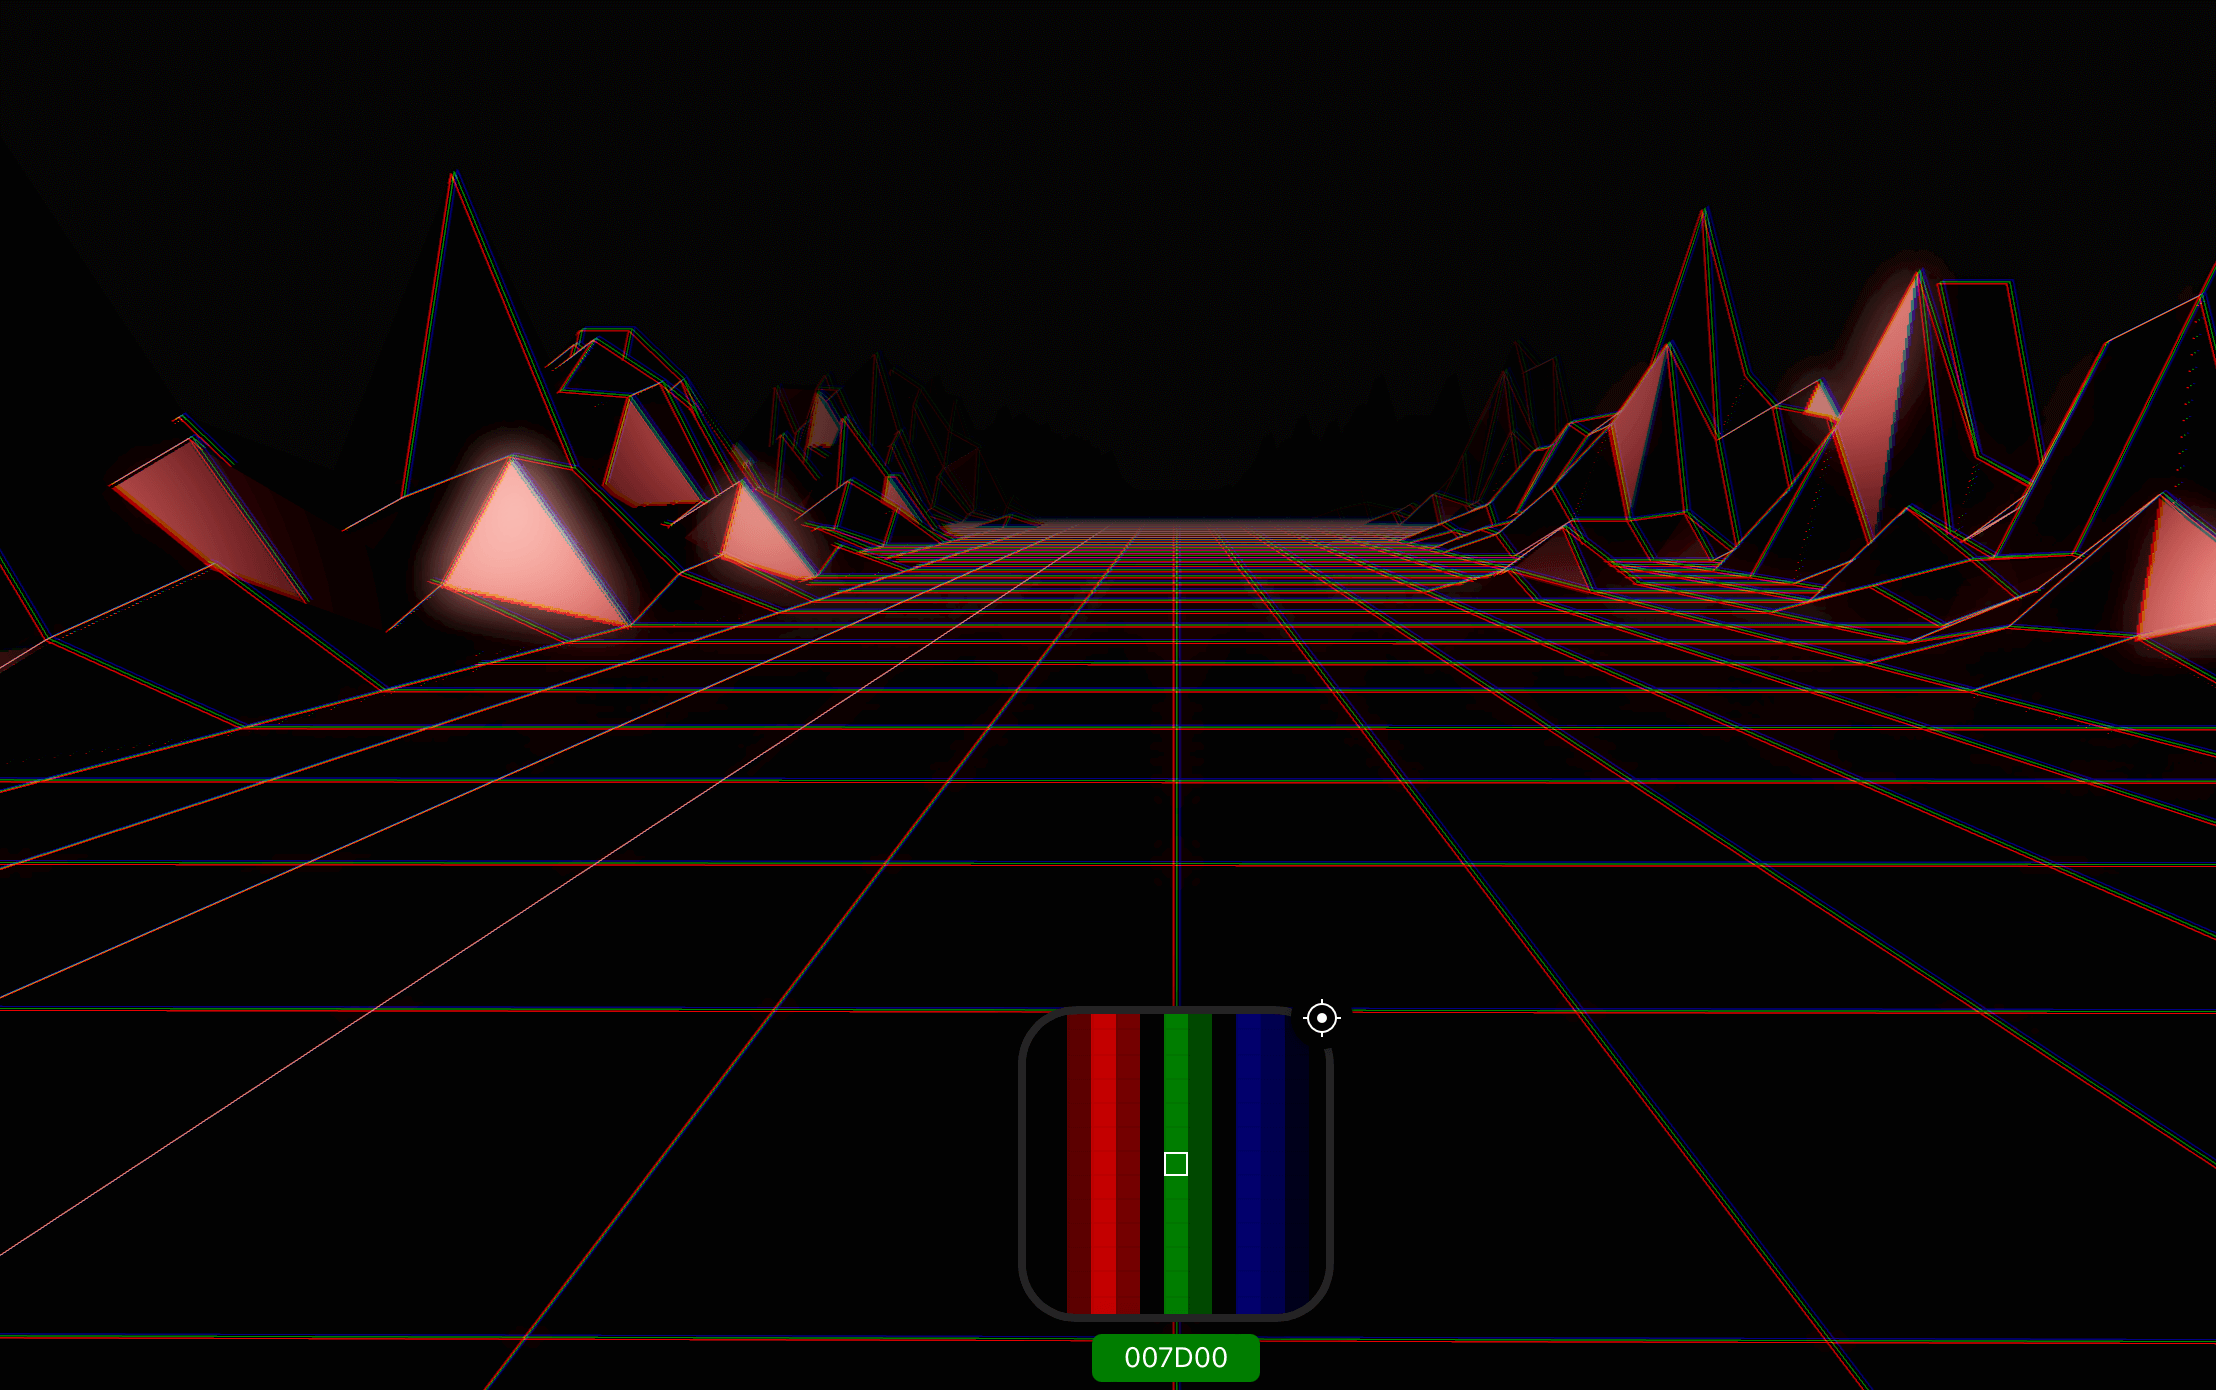
At first glance, it looks like we got our texture kind of wrong right? It's actually a bit more subtle than this. Trust me I tried to rebuild a grid with RGB lines, the result was complete garbage 🤮.
The Linear WebGL scene actually leverages some Three.js post-processing effects. In this specific case, it uses an RGBShift effect. Or at least I think so 😄. It's the only effect that brings our scene closer to the result the Linear team got. So we'll use that going forward.
Below, you can find the code I came up with to include the RGBShift effect in our scene:
Applying post-processing effect to our Three.js scene
1// Renderer code...23// Post Processing4// Add the effectComposer5const effectComposer = new EffectComposer(renderer);6effectComposer.setSize(sizes.width, sizes.height);7effectComposer.setPixelRatio(Math.min(window.devicePixelRatio, 2));89/**10* Add the render path to the composer11* This pass will take care of rendering the final scene12*/13const renderPass = new RenderPass(scene, camera);14effectComposer.addPass(renderPass);1516/**17* Add the rgbShift pass to the composer18* This pass will be responsible for handling the rgbShift effect19*/20const rgbShiftPass = new ShaderPass(RGBShiftShader);21rgbShiftPass.uniforms['amount'].value = 0.0015;2223effectComposer.addPass(rgbShiftPass);2425// Resize handler code...2627// Animate code...28const tick = () => {29//...3031// Render32/**33* We don't need the renderer anymore, since it's taken care of34* in the render pass of the effect composer35*/36// renderer.render(scene, camera);37/**38* We use the render method of the effect composer instead to39* render the scene with our post-processing effects40*/41effectComposer.render();4243// Call tick again on the next frame44window.requestAnimationFrame(tick);45};
You can see some new elements were introduced here:
- the
EffectComposer: the class that manages all the post-processing effects to eventually produce the final result - the
RenderPass: the pass responsible of the first render of the scene. - our
rGBShiftPass: the post-processing pass responsible to apply theRGBShifteffect.
When I applied this effect for the first time, the colors ended up looking... quite off:
After some investigation, I found out that after applying certain effects, Three.js scenes might get darker because the renderer's output encoding is not working anymore. To fix this we need to add another post-processing effect pass named GammaCorrectionShader which will act as a kind of color correction layer to our scene.
In the playground below you'll find our rendered scene with our post-processing-effects looking simply fabulous ⚡️. In it you can try to:
- Comment out the
gammaCorrectionPassand see how the colors end up a bit messed up - Tweak the value of the
rgbShiftPassto make our RGB shift more or less intense!
Let there be light!
We're now missing the most important aspect of our scene: the light! The original scene has some kind of a red-ish light being reflected on some (not all) squares of the grid with some kind of a brushed metal effect. How do we achieve that?
I had to look for hints to figure out what to do here. By looking at the reflective squares on the grid, I figured that there should be two lights pointing at the sides of the scene (not the floor). After a bit of research, it seemed that spotlights were the only lights that were fit for that so I defined them as follows:
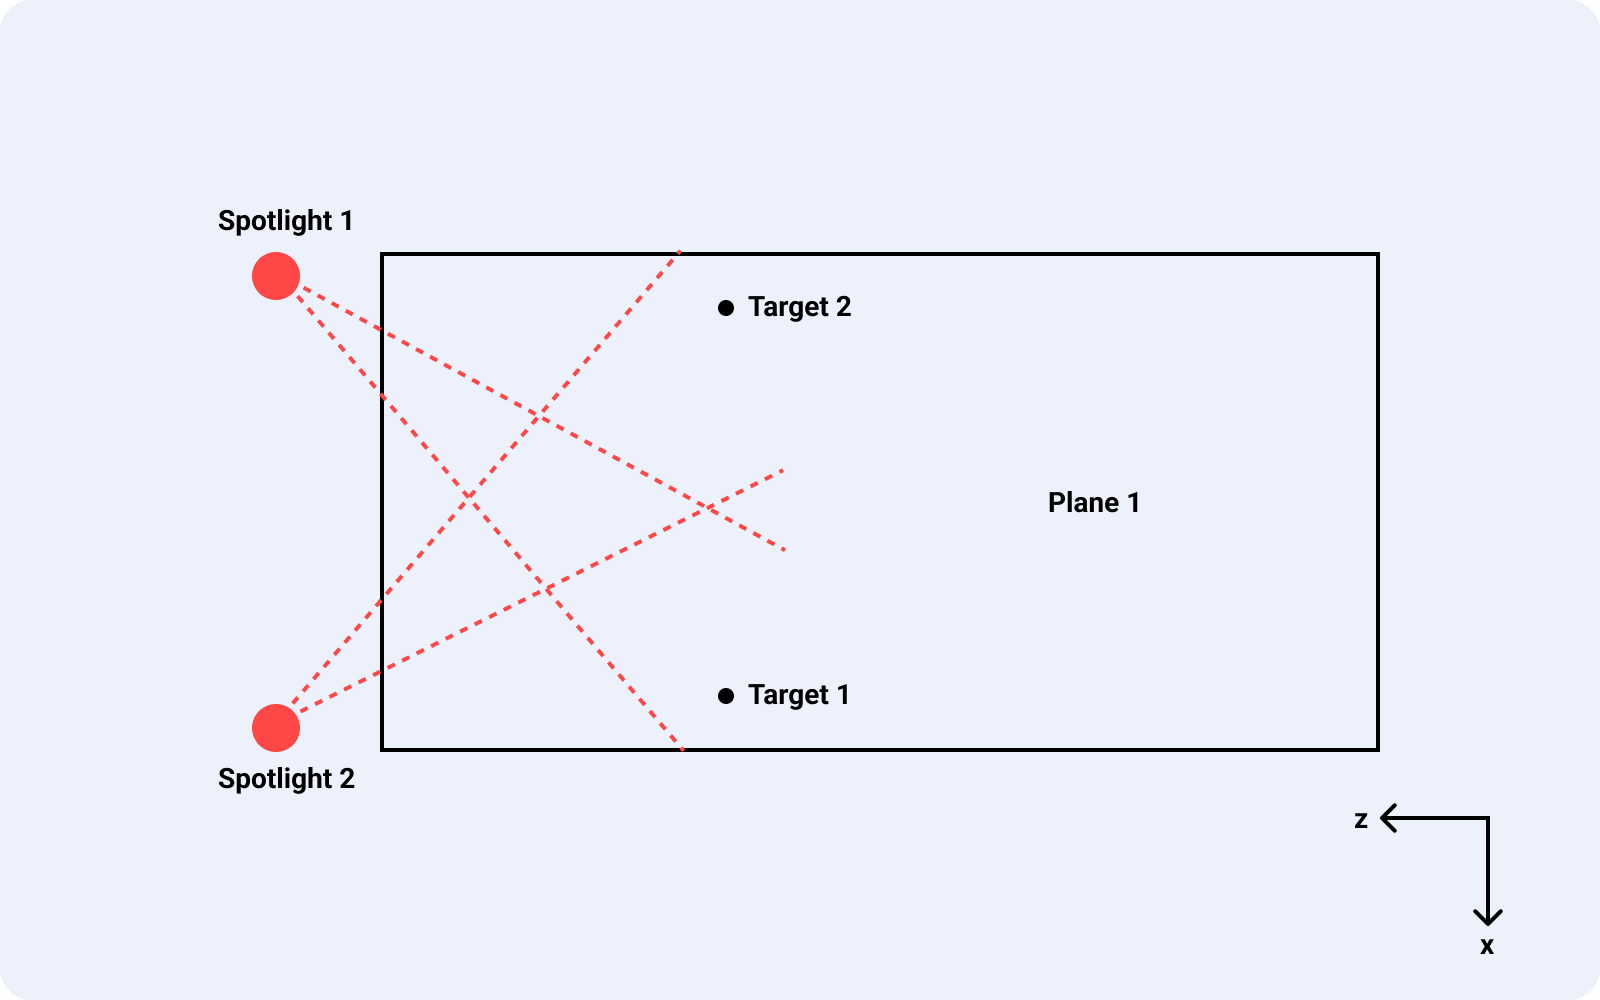
Which would be equivalent to the following code:
Adding and positioning spotlights in our Three.js scene
1// Ambient light code...23// Right Spotlight aiming to the left4const spotlight = new THREE.SpotLight('#d53c3d', 20, 25, Math.PI * 0.1, 0.25);5spotlight.position.set(0.5, 0.75, 2.2);6// Target the spotlight to a specific point to the left of the scene7spotlight.target.position.x = -0.25;8spotlight.target.position.y = 0.25;9spotlight.target.position.z = 0.25;10scene.add(spotlight);11scene.add(spotlight.target);1213// Left Spotlight aiming to the right14const spotlight2 = new THREE.SpotLight('#d53c3d', 20, 25, Math.PI * 0.1, 0.25);15spotlight2.position.set(-0.5, 0.75, 2.2);16// Target the spotlight to a specific point to the right side of the scene17spotlight2.target.position.x = 0.25;18spotlight2.target.position.y = 0.25;19spotlight2.target.position.z = 0.25;20scene.add(spotlight2);21scene.add(spotlight2.target);2223// Sizes...
Now, what about the reflective parts of our terrain? When we introduced our MeshStandardMaterial earlier, we mentioned that it is a physical-based material. This means we can tweak its properties to make it interact with light and its environment like a real material such as:
metalness: How much the material is like metal.0being non-metallic and1being purely metallic.roughness: How rough the material is.0being smooth, almost mirror-like, and1being diffuse.
In our case, however, our material doesn't behave consistently:
- some squares diffuse some light so they will be rougher and less metallic
- some other squares diffuse no light so they will be purely metallic
To achieve this we can set the metalnessMap property of our material: a texture to indicate the parts of our mesh should be metallic and the ones that should not.
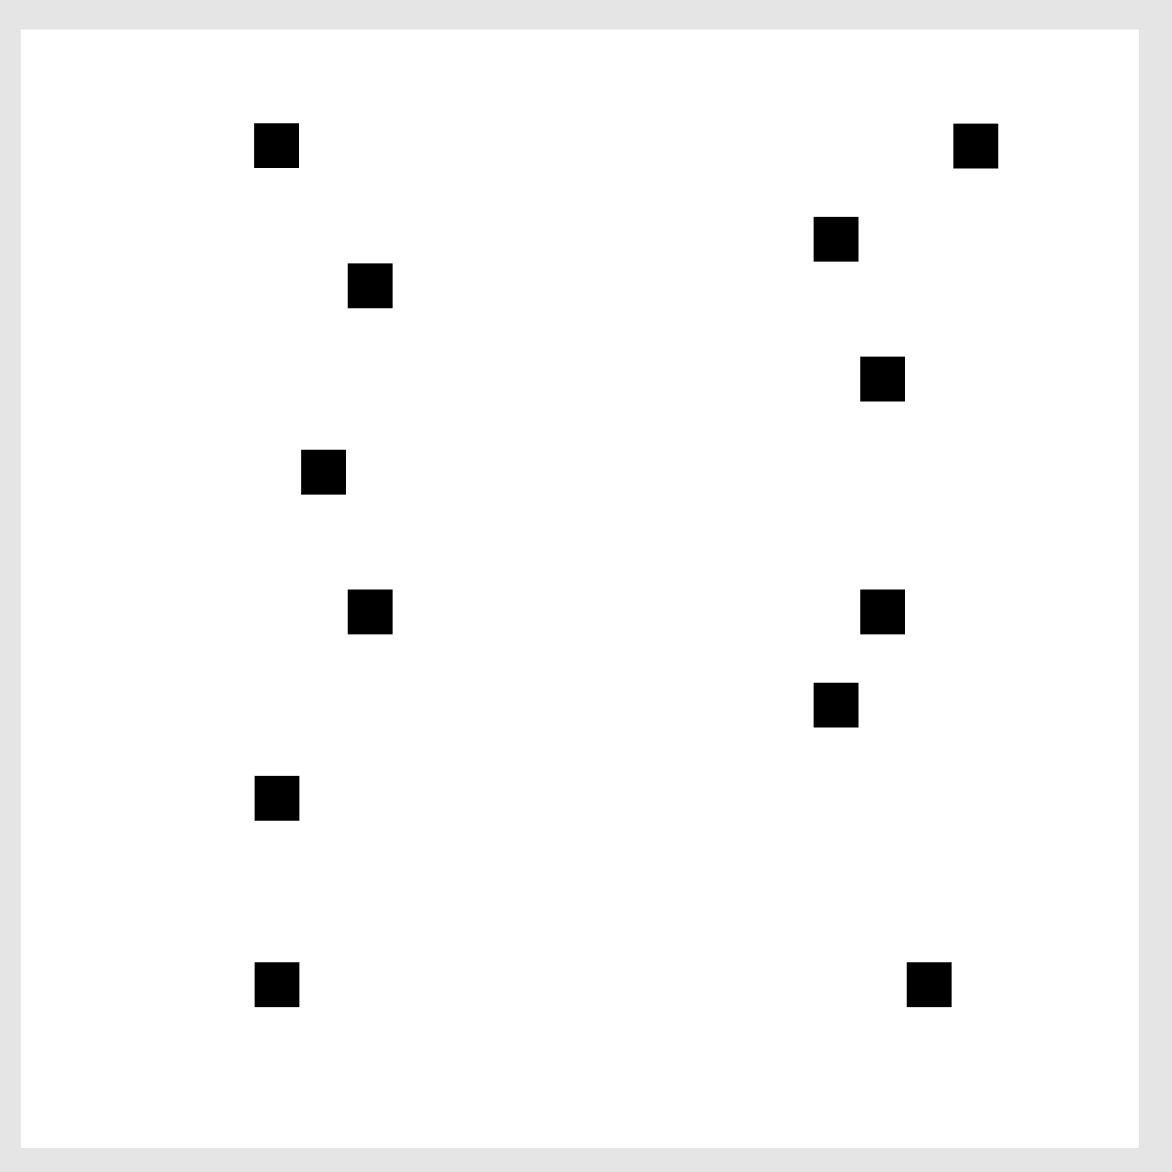
By adding this metalnessMap, tweaking the metalness and roughness values of our material (I chose respectively 0.96 and 0.5, again by tweaking a lot), and finally adding the right light pointing at the right spot on our scene we get our final result that is pretty spot on 🎉!
Conclusion
From a simple plane geometry, we managed to build with just a few lines of code and a bit of tweaking a sleek, animated, vaporwave Three.js scene 🎉 . We could spend a ton of time trying to tweak this scene even further to improve:
- the light: I didn't nail that one quite well 😅
- the texture: the grid appears to be a bit too thick. Maybe the original team didn't use a texture after all and instead relied on shaders?
- probably performance
- add some sick tracks as background music to go with the vibe of the scene
but without the original scene, it will be quite hard to get exactly the same result. This entire project was purely done by guessing and applying the things I learned through the Three.js journey course so I feel the result looks already pretty cool!
I hope you liked this project as much as I did. I feel like it's a great first project to get a bit more hands-on with some of the fundamental concepts of Three.js such as:
- anything dealing with meshes: textures, geometries, materials and their properties
- light and post-processing effects that can, if tweaked properly, give the perfect mood to your scene
- animations and frame rate
and not get stuck in tutorial hell. If you wish to further improve your Three.js skills I highly encourage taking a simple scene you like and start reverse-engineering it/rebuild it as I did for this one: you will learn a lot!
If you want to hack on top of it and have some fun, or simply use it as a base for your next Three.js creation you can head over to the Github repository of this project 😄. I also took the time to write this scene in React-three-fiber. It can serve as a great example if you're looking to learn how to build reusable React components from your Three.js objects.